I believe it’s high time we attempted to build a game with the engine we have so far. Wouldn’t you agree? We’ll be making Asteroids, which first made its debut in November 1979; released by Atari Inc.
There are so many ways we could implement the game:
- we could use sprite sheets, as we do support them now
- we could use code to draw the game elements
- we can even add sounds as the AssetsLoader class supports this
I believe there’s more learning value in trying to draw the game elements using JavaScript, so things like the player, bullets, asteroid, and star fields will all be individual classes.
We don’t have fancy things like collision yet, so the game will be pretty dull at first. But don’t worry, collision is definitely on the to-do list.
We’ll start with the player… we’ll need some sort of ship, that moves according to the VerletModel we previously implemented. The canvas cartesian coordinate system begins with x = 0 and y = 0 at the top-left corner, so anything we draw is relative to that; we want this ship:
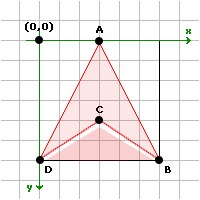
The instructions necessary to draw this are: moveTo() point A then lineTo() points B, C, D and back to A. The line from D to A is optional, as we could simply call closePath(). We’ll reuse points B, C and D, with some offsets, to create the ship thruster.
We could create a utility method for drawing. It would take two parameters: a set of actions and a set of coordinates for each action. This method should be part of the DisplayObject class as anything that’s drawn, extends it.
We’re only using moveTo() and lineTo() for now, so that’s all our engine will be instructed to use:
import Scene from './Scene';

const allowedActions = ['moveTo', 'lineTo'];

export default class DisplayObject extends Scene {
  constructor(x=0, y=0) { /* */ }
  add(elem) { /* */ }
  draw(actions, coordinates) {
    for(let a of actions.keys()) {
      if(allowedActions[actions[a]]) {
        this.ctx[
          allowedActions[actions[a]]
        ](...coordinates[a]);
      }
    }
  }
  remove(elem) { /* */ }
  update() { /* */ }
};
The draw() method can be used like this:
// normal approach
// moveTo(10, 10)
// lineTo(10, 20)
// lineTo(20, 20)
// draw method approach
draw([0, 1, 1], [[10, 10], [10, 20], [20, 20]]);
You could argue this method does more harm than good and without proper documentation I admit, it can be confusing… but it’s a helper method, we don’t have to use it. For the sake of clarity, I won’t be using it in these posts.
Our ship needs to rotate around its center point so that fact has to be taken into account when we calculate the coordinates needed to draw it.
import { Scene, DisplayObject, AssetsLoader, KeyboardEvents } from '../../engine';

export default class Player extends DisplayObject {
  constructor(model) {
    super();
    let assets = new AssetsLoader().assets;
    this.model = model;
    this.assets = assets;

    let onKeyUp = (e) => {
      if(this.LEFT || this.RIGHT || this.A || this.D) {
        model.rotationSpeed = 0;
      }

      if(this.UP || this.W) {
        model.acceleration = 0;
        model.friction = 0.96;
        model.thrusterOn = false;
      }

      if(this.SPACE) {
        model.fire = false;
        assets.laserThum.pause();
        assets.laserThum.currentTime = 0;
      }
    }

    this.on(KeyboardEvents.KEY_UP, onKeyUp);
  }

  update() {
    this.model.scene = this.scene;

    // update the model
    this.model.update();

    if(this.LEFT || this.A) {
      this.model.rotationSpeed = -10;
    }

    if(this.RIGHT || this.D) {
      this.model.rotationSpeed = 10;
    }

    if(this.UP || this.W) {
      this.model.acceleration = 0.2;
      this.model.friction = 1;
      this.model.thrusterOn = true;
    }

    if(this.SPACE) {
      this.model.fire = true;
      this.assets.laserThum.play();
    }

    // wrap the square to the scene bounds
    Scene.wrap(this.model);
  }

  render() {
    const { x, y, angle, fivePerc, halfSize, thirdSize, color } = this.model;
    this.ctx.save();
    this.ctx.beginPath();
    this.ctx.translate(x, y);
    // rotate the ship based on the angle, and offset it by pi/2
    this.ctx.rotate(angle + Math.PI*0.5);
    this.ctx.fillStyle = color;
    this.ctx.moveTo(-halfSize, halfSize);
    this.ctx.lineTo(0, -halfSize);
    this.ctx.lineTo(halfSize, halfSize);
    this.ctx.lineTo(0, halfSize-thirdSize);
    this.ctx.fill();
    this.ctx.closePath();
    this.ctx.restore();

    if(this.model.thrusterOn) {
      this.ctx.save();
      this.ctx.beginPath();
      this.ctx.translate(x, y);
      this.ctx.rotate(angle + Math.PI*0.5);
      this.ctx.fillStyle = '#A30';

      this.ctx.moveTo(halfSize - fivePerc, halfSize);
      this.ctx.lineTo(-halfSize + fivePerc, halfSize);
      this.ctx.lineTo(0, halfSize - thirdSize + fivePerc);
      this.ctx.fill();
      this.ctx.closePath();
      this.ctx.restore();
    }
  }
}
As you can see, our Player class is both a view and a controller. You can control the ship using the arrow keys or (W, A, D), and the SPACE key to play a shooting sound (although we’re don’t have bullets yet). We’re missing the PlayerModel… let’s add that as well:
import { VerletModel } from '../../engine';

export default class PlayerModel extends VerletModel {
  constructor() {
    super();
    this.temporaryX = 0;
    this.temporaryY = 0;
    this.friction = 0;
    this.frictionX = 0;
    this.frictionY = 0;
    this.acceleration = 0;
    this.rotationSpeed = 0;
    this.thrusterOn = false;
    this.rotationValue = -90;
    this.size = 40;
    this.halfSize = this.size * 0.5;
    this.thirdSize = this.size * 0.33;
    this.fivePerc = this.size * 0.05;
    this.color = '#590';
    this.ang = 0;
    this.accX = 0;
    this.accY = 0;
  }

  update() {
    this.temporaryX = this.x;
    this.temporaryY = this.y;

    // calculate the rotationValue
    this.rotationValue += this.rotationSpeed;

    // calculate the angle and acceleration
    this.ang = this.rotationValue * (Math.PI / 180);
    this.accX = Math.cos(this.ang) * this.acceleration;
    this.accY = Math.sin(this.ang) * this.acceleration;

    this.frictionX = this.vx * this.friction;
    this.frictionY = this.vy * this.friction;

    if(!this.thrusterOn) {
      if((Math.abs(this.vx) < 0.1) && (Math.abs(this.vy) < 0.1)) {
        this.accX = 0;
        this.accY = 0;
        this.frictionX = 0;
        this.frictionY = 0;
      }
    }

    this.x += this.accX + this.frictionX;
    this.y += this.accY + this.frictionY;

    // set the previous positions to temporary values
    this.previousX = this.temporaryX;
    this.previousY = this.temporaryY;
  }

  get angle() {
    this.ang = this.rotationValue * (Math.PI / 180);
    return this.ang
  }

  get accelerationX() {
    this.accX = Math.cos(this.ang) * acceleration;
    return this.accX;
  }

  get accelerationY() {
    this.accY = Math.sin(this.ang) * acceleration;
    return this.accY;
  }
};
This one is similar to what we’ve implemented in our previous examples, but with a few extra features. The update function of the PlayerModel also treats rotation and adds a speed trap which slows down the ship if the thrusters are off. We could add all of these features directly into the VerletModel and just enable them if/when we need them, but this is fine for now.
The next thing we could do is create a Map class. This would draw some indicators of all the objects rendered on the scene, like the player and asteroids.
It’s basically an in-game map and it will take two parameters:
- the marker (indicator) size and
- the map scale factor.
The latter will represent the percentage of the map size, relative to the scene size. The Map class looks like this:
import { DisplayObject } from '../../engine';

export default class Map extends DisplayObject {
  constructor(markerSize=4, mapScaleFactor=0.2) {
    super();
    this.markerSize = markerSize;
    this.mapScaleFactor = mapScaleFactor;
  }

  update() {
    this.mapW = this.scene.width * this.mapScaleFactor;
    this.mapH = this.scene.height * this.mapScaleFactor;
  }

  render() {
    // draw map container
    this.ctx.save();
    this.ctx.beginPath();
    this.ctx.globalAlpha = 0.1;
    this.ctx.fillStyle = '#fff';
    this.ctx.rect(0, 0, this.mapW, this.mapH);

    this.ctx.fill();
    this.ctx.globalAlpha = 1;
    this.ctx.closePath();
    this.ctx.restore();

    for(var child of this.children) {
      this.ctx.save();
      this.ctx.beginPath();
      this.ctx.fillStyle = child.model.color;
      this.ctx.rect(...this.getSize(child.model));
      this.ctx.fill();
      this.ctx.closePath();
      this.ctx.restore();
    }
  }
  getSize(target) {
    const { mapW, mapH, mapScaleFactor, markerSize } = this;
    let tx = target.x * mapScaleFactor;
    let ty = target.y * mapScaleFactor;
    let markerW = mapW - tx < markerSize ? mapW - tx : markerSize;
    let markerH = mapH - ty < markerSize ? mapH - ty : markerSize;
    markerW = markerW < 0 ? 0 : markerW;
    markerH = markerH < 0 ? 0 : markerH;

    return [
      tx,
      ty,
      markerW,
      markerH
    ];
  }
};
The getSize() method will resize the marker when it gets close to the outer edges of the map. This is to prevent it from overflowing the Map container size.
Let’s also add in a StarField for good measure; it should generate:
- a dynamic number of stars
- it would be nice to automatically generate 3 types of star sizes (large, medium, small) to emulate some sort of depth; we’ll also change their colors from bright white to dark gray.
- it should move the stars relative to the PlayerModel and star size, creating a parallax effect where closer stars move faster than stars further away
import { Scene, Particle, DisplayObject } from '../../engine';

export default class StarField extends DisplayObject {
  constructor(model, amount=90) {
    super();
    this.model = model;
    this.amount = amount;
    this.starSize = 3;
    this.stars = [];
  }

  generateStars() {
    const { amount, stars, starSize } = this;
    const thirdAmount = parseInt(amount / 3, 10);
    const mStarSize = parseInt(starSize / 1.5, 10);
    const sStarSize = parseInt(starSize / 3, 10);
    let bStar;
    let mStar;
    let sStar;

    for (let i = 0; i < thirdAmount; i++) {
      // stars
      bStar = new Particle(starSize);
      mStar = new Particle(mStarSize, '#aaa');
      sStar = new Particle(sStarSize, '#777');

      // big star
      bStar.x = Math.random() * this.scene.width;
      bStar.y = Math.random() * this.scene.height;
      stars.push(bStar);

      // medium star
      mStar.x = Math.random() * this.scene.width;
      mStar.y = Math.random() * this.scene.height;
      stars.push(mStar);

      // small star
      sStar.x = Math.random() * this.scene.width;
      sStar.y = Math.random() * this.scene.height;
      stars.push(sStar);
    }

    this.add(stars);
  }

  update() {
    // render all children
    super.update();

    const { stars, model, starSize } = this;
    let scale;

    if (!stars.length) {
      this.generateStars();
    }

    for (let i=0; i < stars.length; i++) {
      // scale the speed of the star based on its size
      scale = stars[i].size / starSize;

      // move stars
      stars[i].x -= model.vx * scale;
      stars[i].y -= model.vy * scale;

      // wrap stars
      Scene.wrap(stars[i]);
    }
  }
}
You’ll notice that we’re calling super.update() in the update() method. That’s to make sure that all of the stars that we added as children in the generateStars() method, are rendered. Alternatively we could write our own render() method that does this, but let’s use the engine :D!
The parallax effect comes into play on lines 62 & 63 where we’re calculating the x and y positions of each star based on the model velocity and star scale. We’re also wrapping the stars to the scene, so it feels like we’re flying through a never ending field. Changing the star color based on its size also adds a nice touch to the overall effect.
You’ll also notice we’re using a Particle class in there. That’s something new and it’s part of the engine. It draws a circle of a specified radius and color:
import DisplayObject from './DisplayObject';

export default class Particle extends DisplayObject {
  constructor(radius=10, color='#fff') {
    super();
    this.size = radius;
    this.color = color;
    this.width = this.height = radius*2;
  }
  render() {
    this.ctx.save();
    this.ctx.beginPath();
    this.ctx.translate(this.x, this.y);
    this.ctx.fillStyle = this.color;
    this.ctx.arc(this.x, this.y, this.size, 0, 2*Math.PI);
    this.ctx.fill();
    this.ctx.closePath()
    this.ctx.restore();
  }
};
Let’s put everything together and see how it works:
import { Game, Scene, AssetsLoader } from '../engine';
import Player from './objects/Player';
import StarField from './objects/StarField';
import Map from './objects/Map';
import PlayerModel from './models/PlayerModel';

require('../../scss/styles.scss');

let assetsLoader = new AssetsLoader();
let scene = new Scene();
let game = new Game(scene);
let playerModel = new PlayerModel();
let player = new Player(playerModel);

// generate a starfield with 300 stars
let starField = new StarField(playerModel, 300);

// create the game map
let map = new Map();

// track the game objects
map.add([
  player
]);

let initGame = () => {
  // center player
  playerModel.x = (scene.width - playerModel.size) * 0.5;
  playerModel.y = (scene.height - playerModel.size) * 0.5;

  // render starfield, player and map
  scene.add([
    starField,
    player,
    map
  ]);
};

// load the laser sound
assetsLoader.load([
  './assets/laser-thum.mp3'
]).then(initGame);
Next time we’ll learn how to generate random asteroids, so that all of the rocks look a bit different, add them to the map for tracking and bullet generation logic.