Organizing a successful requirements workshop can be a great way to collaborate with key stakeholders and subject matter experts (SMEs).
It helps generate ideas for new features or products, reach a consensus on a topic, or review requirements or designs. In this guide, we will use the 5W1H method to help you plan and succeed in your future requirements workshop.
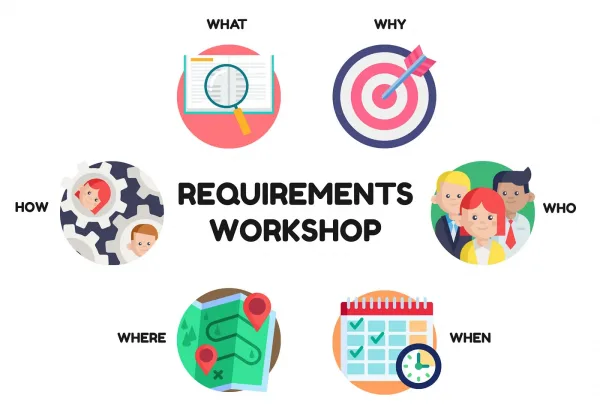
The 5W1H of a requirements workshop
What is a requirements workshop?
According to the IIBA’s Business Analysis Book of Knowledge 3rd edition, the requirements workshop is a focused event attended by key stakeholders and subject matter experts (SMEs) for a concentrated period of time. A workshop may be used to generate ideas for new features or products, to reach a consensus on a topic, or to review requirements or designs. Workshops can promote trust, mutual understanding, and strong communication among the stakeholders and produce deliverables that structure and guide future work efforts.
When we think of a workshop the image that comes to mind is a facilitator leading a group of people through some activities. But that is just the tip of the iceberg.
Steps
To organize a successful requirements workshop you need to go through the steps below:
- Define the purpose, goals, and objectives.
- Determine who should attend.
- Create a detailed agenda.
- Determine the appropriate time and length of the meeting.
- Determine the best meeting format and location.
- Send out the meeting invite and agenda several weeks in advance.
- Facilitate and lead the workshop.
- Document and summarize the action items.
- Send out a meeting summary.
- Follow up on action items and schedule additional meetings as needed.
In the steps above we see that only step 7 is the actual workshop facilitation. The other steps are either before or after.
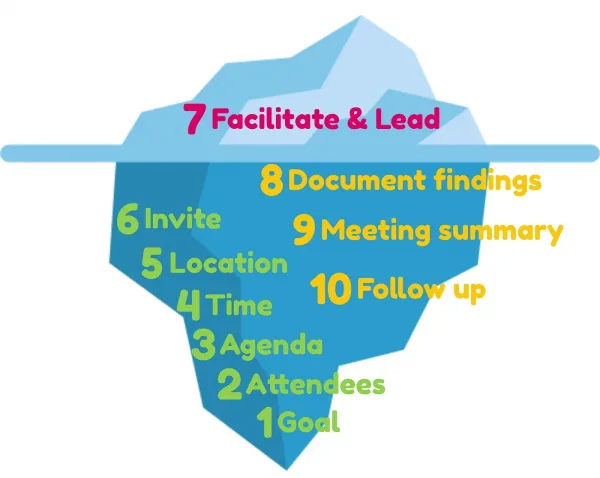
The iceberg of a requirements workshop
Why should you organize a requirements workshop?
The requirements workshop is useful if:
- the project is high-risk and high-impacting
- you need to elicit many requirements in a short period of time
- multiple people share the knowledge (especially if they tend to provide conflicting information)
- you need to reach an agreement or complex decisions
- you need to get buy-in from the stakeholders
However, there are some drawbacks:
- Requirements workshops can be expensive and difficult to organize.
- Involving the wrong people makes workshops ineffective.
- Unless they are correctly facilitated, they can lead to people not contributing.
There are also cases when a requirements workshop is not advised. For example if:
- the project is small and low impacting, the cost is not justified.
- you don’t have a sponsor or decision-makers involved. The outcome will not be validated and will need future meetings.
- you need to elicit specific detailed requirements. In that case, having a large group of people is an improper use of their time.
Who should you invite to the workshop?
Below is a list of roles you should consider inviting.
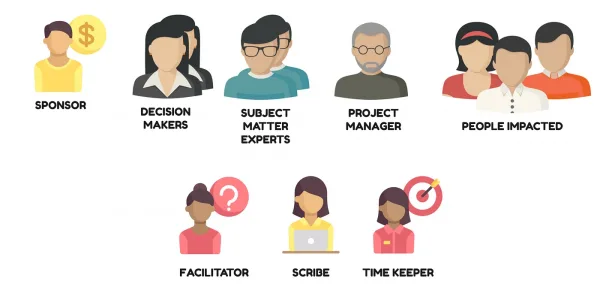
The participants for a successful requirements workshop
Project Sponsor
The project sponsor pays for the project and workshop, champions its success, and is the tiebreaker. Without a sponsor, your workshop (and likely project) is bound to fail. If they are not available for the whole period, have them be present in key moments of the workshop. For example to present the objective and when important decisions need to be made.
Decision Makers
The decision-makers can prioritize. Their buy-in on the decisions and outcome of the workshop ensures the project’s continuation beyond the initial meeting.
Subject Matter Experts (SMEs)
The subject matter experts provide valuable insight into business rules, constraints, and how the business operates in practice. The SMEs can be domain subject matter experts or implementation subject matter experts. For software development projects it is recommended to include an architect or a senior developer. They will provide valuable technical insights.
Project Manager
The project manager can help act out and follow up on topics identified during the workshop.
People Impacted
It is important to have at least a representative of the people impacted (many times these are the actual end users). They don’t have decision power but they can provide crucial information that other people may not be aware of.
Facilitator
The facilitator must be a neutral person to the topic in discussion. A person that is not impacted by the topic of the workshop can help lead the participants toward the goal in an unbiased way.
Scribe (recommended)
The facilitator needs to be fully engaged with the participants. The scribe will take notes during the workshop.
Timekeeper (optional)
The timekeeper is in charge of making sure the facilitator and participants keep to the agenda and do not exceed the allotted times. The scribe can also take on this role. It’s not always a separate person. Or you can use a simple timer app.
In some cases you may not have additional resources, so the facilitator is the only one from the three above. In that case, make sure you pause to take notes of important discussions. For transparency, you can write your notes in a visible place. Like a whiteboard or flip chart. Alternatively, you can record the session(s) with the participants’ agreement.
Observer (optional)
In some cases, an observer may also be present. This person doesn’t contribute. They observe the proceedings. Usually, it is a person that is there to learn or someone from HR.
When should you organize a requirements workshop?
You can organize the workshop at any stage of the project. Indeed, you can organize it whenever you need to pull in a lot of brain power from the project team.
Workshops are usually organized at the beginning of an initiative, but also to clarify certain aspects of the project.
In terms of timing, the workshop should take place after you’ve gathered some initial information you’ve agreed on a topic. And of course when the critical attendees are available.
The length of a workshop is determined by the activities planned, but it can go from one day to several days. Do not keep people longer than necessary.
Where should you hold the requirements workshop?
In-person, face-to-face workshops should be organized offsite to avoid office distractions. That can mean a hotel conference room, a coworking space, or if you’re external to the customer it can be in your offices.
The space where the workshop takes place must be well suited to the type of activities you plan to include.
For example, the space may need to have:
- whiteboards or flip charts
- free wall space for post-its
- a sitting area and a standing area. If people are going to be sitting for long periods make sure there is proper seating available.
- relaxation area
- area to serve food/drinks
- projector screen
- free space to perform any activities that require movement
How to hold a requirements workshop?
Now that we’ve covered what is a workshop, why you would need one, who to invite, and when and where to organize it, it’s time to look at how to facilitate it.
Before the Requirements Workshop
Like Benjamin Franklin said, “by failing to prepare you are preparing to fail”.
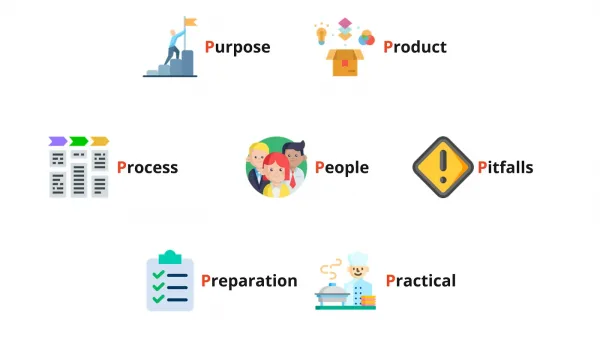
To prepare for a successful workshop I like to use the 7Ps framework by James Macanufo to consider seven areas for which to prepare:
- Purpose
- Product
- Process
- People
- Pitfalls
- Preparation
- Practical Concerns
The seven Ps to prepare for a requirements workshop
Let’s dig into each one of these areas.
Purpose
The first question to answer is do you really need a workshop? It’s worth going over the questions from the Why section. Is this a high-impacting project? Is the knowledge shared by multiple people? Do you need buy-in from multiple stakeholders? Does the company need to take important decisions?
The decision to organize a workshop requires research and interaction with the stakeholders. They must agree that it’s in everyone’s interest to use a requirements workshop.
If the workshop is required, then identify its purpose by thinking of what you are trying to achieve. Perhaps you need to optimize an existing process, identify a new one, get agreement on a subject, or get some decisions on a set of topics.
Once you identify the purpose, validate it with the project sponsor. Then ensure that the purpose is well communicated.
Product
Ask yourself what it is that you want to have at the end of the workshop. Perhaps you need to have a process established, a set of decisions, high-level requirements, an agreement on a topic, or a set of priorities.
Having the outcome in mind will help guide you through the activities to tackle. For example, if you want to have as an outcome a new process, then you will have to schedule a process mapping exercise.
Process
In this section, list the activities needed to achieve the workshop’s purpose and outcome.
Some activities include:
- active introductions/icebreakers
- topics to discuss
- brainstorming
- affinity mapping
- process modeling
- prioritization
- root cause analysis
- functional decomposition
This will determine your agenda. Add breaks and associate the necessary time slots. And add enough slack in case certain activities take longer than expected.
One common mistake is to cram too many activities in one day. People need time to get into the mind space of a topic. And they need even more time to start thinking laterally.
People
This section covers the people that you should invite. I’ve already listed out the roles that you should cover. But I would like to highlight again the importance of having the project sponsor present.
You also need decision-makers, subject matter experts (developers, power users, trainers, user agents), and impacted stakeholders.
Think again about your workshop purpose and outcome. Identify who the participants are and how they can help you achieve them.
Ensure participants understand the purpose of the workshop and why it’s important/ useful for them to participate. In other words, “what’s in it for them?”.
You should aim to have between 6 and 10 people in the workshop. If you need more attendees you will need additional facilitators. Split participants into small groups to get the most out of them. This means you will need extra facilitators.
Alternatively, invite additional participants only in certain parts of the workshop.
Another way to think of the recommended number of attendees is the two-pizza rule.
Pitfalls
In the pitfalls section, think of the things that could go wrong and identify if you can prevent them. If not, what can you do about them?
You can use the Inversion technique to think of things that could go wrong, but here are a few common pitfalls:
- participants are not engaged — involve only the right people that understand what’s in it for them. Get their feedback on the activities. Also, setting ground rules at the beginning of the meeting helps.
- off-topic discussions — use the parking lot.
- discussions monopolized by certain attendees — use post-its to have everyone have their say. Or ask the other participants their opinion first. Or if all else fails, use ELMO
- unproductive conflicts during the workshop — think of ways you can handle the conflict
- logistics could fail — make sure you have either backup or support available
- room that is not appropriate for the activities — check the room before the workshop. Then either make changes to the room or find a better room.
Preparation
Is there anything that should be created/discussed before the workshop?
For example, you might need:
- a slide deck to present the context of the project,
- additional information to send to participants before the workshop (or to have during),
- materials to use during the activities,
- copy of the agenda for everyone,
- set of questions to use during the workshop.
You may be responsible only for some of these items. But you must make sure that the people responsible for the items prepare them in time for the workshop.
Practical
For the final P, think of the things you need to have set up for the workshop to ensure it runs smoothly. Some things should be arranged well in advance. Others you can do on the day. For example:
- send the invitation to the workshop including an agenda,
- make necessary travel arrangements,
- book location and catering as needed. You don’t want your participants to be hungry or thirsty or sleepy,
- setup logistics (post-its, markers, notepads, pens, flip-charts, projectors, etc),
- send a meeting reminder with location details and start times,
- prepare the room for activities,
- if the workshop is over several days think to make arrangements for the evenings,
- make sure participants can easily access the meeting location
By covering these seven areas you should have a pretty good idea of what you need to prepare for the workshop.
Template and Examples
To help you apply this framework I’ve created a Miro template that you are welcome to use.
In addition, you can find an example of the 7Ps technique in this article in the BA Times.
Facilitating the Workshop
You’ve prepared for the workshop, and now the time has arrived for the workshop to begin. Here are some suggestions to help you successfully facilitate.
Aspects to consider during a workshop
Introduction
Welcome every participant personally and help them accommodate themselves to the location. It’s useful to show them:
- the area for the activities that will take place,
- the refreshment area,
- the restroom area.
Have water and coffee available and some treats to get people in a good mood.
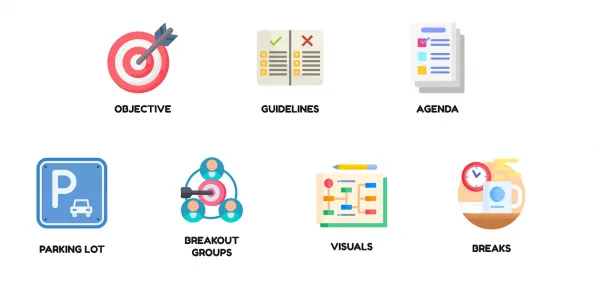
Once people have settled in, hand out the agenda and go over it so that they know what to expect for the day.
You should then remind everyone of the objective. Explain why you are all there and what you are trying to achieve.
To get things started you could use an active introduction. This allows everyone to explain their relation to the topic. Or you can use an icebreaker. Or both.
Then establish with the entire group the workshop guidelines. You don’t want to impose your rules on the group. Have them come up with the rules and agree on them. If needed, you can suggest some of the rules below:
- no mobile phones or laptops
- everyone contributes
- judgment-free zone
- keep it professional
- keep it short (you could also introduce ELMO at this point, see the Pitfalls section. it helps to have a plush Elmo or a printed photo)
- stay on topic — at this point, you can introduce the notion of the parking lot to the participants. This way they feel heard, but won’t derail the meeting. Additionally, you can set aside some time in the end to address the parking lot. Or you can set up follow-up meetings.
Facilitation tips
As a facilitator, you should always be standing rather than sitting. It gives the room more dynamic and encourages people to pay attention. You will also want to encourage the participants to stand and work on the whiteboard or a wall of post-its. If possible, place the participants in a circle. It promotes a sense of equality.
Use visuals whenever possible. Workflow diagrams, lightweight prototypes, and wireframes help people visualize concepts. They also ensure everyone is talking about the same thing. The picture below illustrates how visualizing helps with an agreement:

Requirements Workshop: Facilitator Tips (credits for the image)
If you have a large number of participants, then break the large group into smaller groups of 3 to 5 people. This prevents groupthink and encourages participation from the participants. Try to group people on similar levels to give everyone in the group a voice. Otherwise, people with higher rank or seniority might lead the group and inhibit others from contributing.
Stick with the agenda and be aware of the time. You don’t want to spend 80 percent of the time on the first 20 percent of the agenda. You’ll then have to cram the remaining 80 percent in the time left. The role of timekeeper comes in handy here.
You also need to be flexible and adapt. If the activity or conversation is going in the right direction adapt the agenda accordingly.
One thing is for sure, things never go completely according to plan. It’s important to assess your agenda constantly. See what you can shift or skip altogether to achieve your goals.
When the group exceeds the time, remind them of the additional topics. But give them the choice to continue and skip other parts or to move to the next topic. It’s important not to hurry people up. They will contribute less after being told to hurry. You can also use the parking lot when a topic goes over time, to circle back to it.
More facilitation tips
Schedule plenty of breaks and let people know when the next break is. Especially if you have smokers or people with a lot of things to attend to. This way, they’ll be engaged knowing they will have a break soon.
You may introduce unscheduled breaks if people get stuck, or go in circles. A break will help participants reset and see things differently after the break.
Make sure the scribe writes down all decisions and important discussions. The scribe is not involved in facilitating the meeting. They help take really good notes that you can use after the workshop.
Debriefing
At the end thank everyone for their time. Highlight the outcomes and the positives. This helps the participants have a good impression.
It’s also important to acknowledge any difficulties encountered. And to see if they should be addressed in separate meetings. This ensures everyone feels heard.
After the Workshop
Regroup with your scribe to go over the notes and resulting artifacts. Type up a follow-up email while things are still fresh in everyone’s minds. That means either the next day or the next couple of days.
Start by thanking everyone for their time and contribution. Then present the conclusions, followed by action items and a summary of what you discussed during the workshop. This way of structuring information is called the Minto Pyramid.
When listing the action items you can use the PAMO tool. PAMO stands for:
- Problem — what is the problem that this action point is solving?
- Action — what action will solve the problem?
- Measure — how do we know we fixed the problem? Additionally, you can also specify by when to fix the issue
- Owner — who is the person that will address the issue? It’s important to have a single person as the owner. Assigning a group or several people will create confusion as to who has to take care of the issue.
At the very least you should have the action item, who will take care of it, and by when they should come back to the group, even if it’s not solved.
You should also organize any follow-up meetings that resulted from the workshop. This is the time to organize meetings corresponding to the items from the parking lot.
Over the next weeks share updates on the follow-up action items with the group. This shows the participants that progress is being made.
Takeaways
To recap, the requirements workshops are useful for large, high-impacting projects with the knowledge shared by multiple stakeholders.
To run a successful workshop you need to have a clear, validated objective. You must involve a sponsor, decision-makers, and subject matter experts.
Prepare thoroughly so that you can adapt to any situation that may occur.
Then, during the workshop:
- work towards the workshop goal
- set ground rules
- break the large group into smaller groups
- keep participants engaged
- take many breaks
- have fun
Immediately after the workshop send a follow-up email with conclusions and action items. In the weeks after, keep participants updated about the progress.
Let me know what you think. Did I miss any steps or useful advice?
Article written by Sergiu Pocan