Developers or Marketers trying to analyze Google Analytics traffic on a website where filtering pages by URL is not possible.
You’re probably here because you’ve encountered the same issue as us, namely: How can we analyze blog post traffic in Google Analytics (GA4), when the blog URLs on our site are mixed with other page URLs? Well, have no fear, we’ve got your back! Keep on reading to see the solution we came up with as a step-by-step process.
The problem:
Blog post URLs on our website have URLs similar to this: https://www.evozon.com/what-is-data-science/. As you can see, there isn’t much difference between this and other pages, like https://www.evozon.com/what-we-do/. This situation had us facing the following problem: we couldn’t add a filter in GA4 to filter out just the blog traffic data, as we’ve got mixed URLs.
At first, we thought about changing ALL the blog URLs to include /blog, so they won’t be mixed anymore and GA4 will allow us to easily create a filter for them. This means they would’ve looked like this:: https://www.evozon.com/blog/what-is-data-science/. However, we quickly realized this had greater SEO risks than we wanted to take. This change would’ve implied that:
- We will have to create redirects from the old URLs to the new URLs;
- It will take some time for Google to re-index our new URLs;
- We can lose traffic due to this change.
Also, we thought about adding the word “Blog” to every blog post title to create a Google Analytics filter for this. Needless to say, we quickly scraped that thought away, as we realized it wouldn’t be a very efficient solution. And, at the same time, it might’ve even brought us more challenges in the future, because:
- What happens if, in the far-away future, someone starts adding articles without “Blog” in the title?
- What if we mistakenly forget to change some of the blog post names from the past?
The solution
With no other options available in front of our eyes, we embarked on a research journey. A better solution had to exist. But we just had to dig a little deeper. Our goal was to find a solution that helped us monitor our results in GA4 with no risks from an SEO perspective. So, our quest began. Among the various ideas we found that were not 100% satisfying us, we also stumbled across this gem that’s hiding right under this link.
And, to be more precise, this is the solution we’re talking about (we extracted the quote from the aforementioned website):
Thank you! I used the Google Tag Manager to create a custom variable now. Since blog posts have the post type “post”, instead of “page” in WordPress, they can be distinguished by that. However, it requires to set this up in the Google Tag Manager. In Google Analytics I have then the dimension “post type” which I can use to filter. This only works for any future traffic, however, since the variable hasn’t been tracked in the past ofc, which makes this only a partial solution. But it works for me. I might post this in more detail as an answer, if I have the time – @TheKidsWantDjent
We’ve got a winner! Using a custom variable in GTM is a fantastic idea, especially if your blog posts have something that visually differentiates them from the rest of the website. And, as this is the case most of the time when it comes to blogs (ours has, for example, a category menu on the left side), we knew this is what we were looking for.
Following this idea, you can differentiate between blog posts and pages in the “background”. And, by doing this, you’re not changing anything from a user perspective and also not losing that much-appreciated SEO juice. without changing anything for the user or losing that much-appreciated SEO juice. As user @TheKidsWantDjent says, this will only work for future traffic. But, our other options only worked for future traffic as well, so it was worth giving it a try. Now that we knew what we wanted to achieve, we started to look for a step-by-step process to ensure we implemented it correctly. But, since we didn’t manage to find a more in-depth article, video, or anything else on this, we decided to take the bull by the horns. We implemented it on our own, it worked (yaay!) and, below, you’ll find the process we followed.
How to Filter Blog Post Traffic in GA4 when Mixed URLs: the Step-By-Step Process
I suppose you already have Google Analytics (GA4) implemented through Google Tag Manager (GTM). If you don’t, you can find a ton of excellent documentation from Google here. But, if you do, let’s go through the steps together, slow and steady:
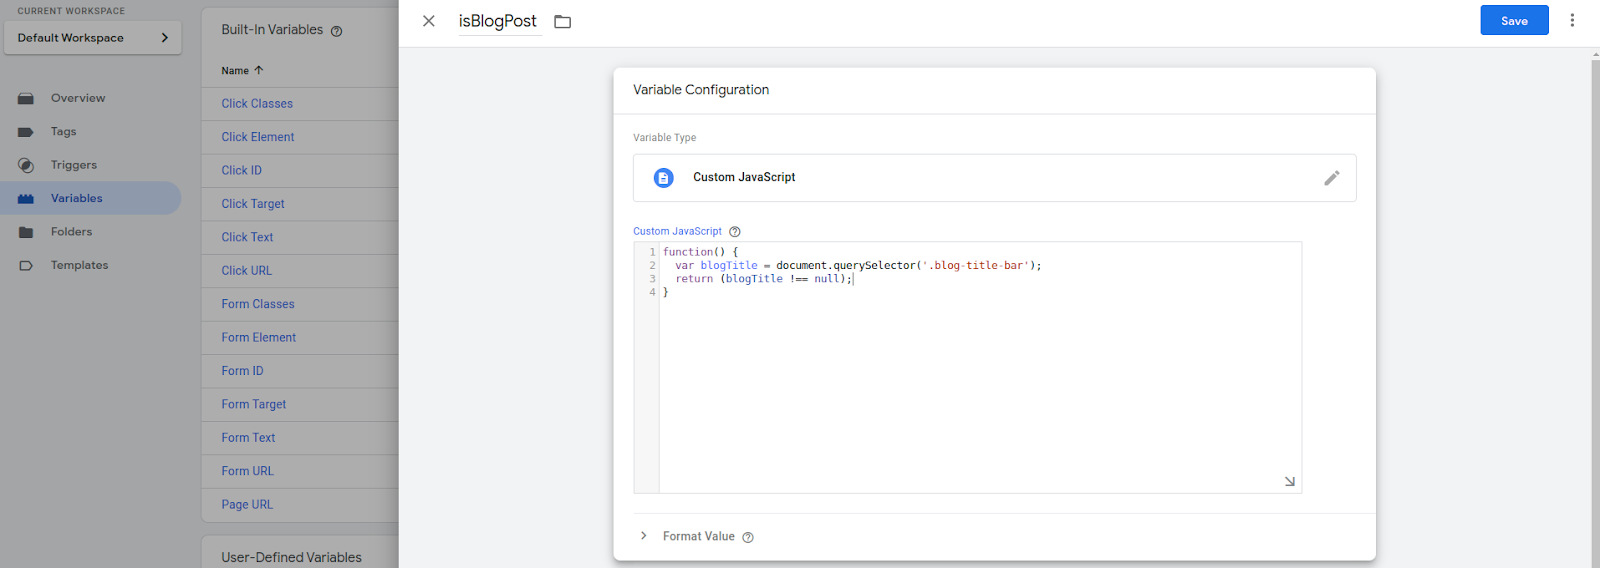
STEP 1: Configure a custom variable in GTM to check if a blog-specific element is present on a page
Go to GTM > Variables > New. If you don’t see the “New” button on the variables page, make sure you have sufficient permissions. Name your variable however you deem fit. Then, choose the variable type to be Custom Javascript, like below:
Screenshot from GA4
In our case, the element we used is part of the blog menu and has the class “.blog-title-bar”. Pretty much, the variable returns true if the element is found on the page, and false if it’s not.
The code above is:
function() {
  var blogTitle = document.querySelector('.your-blog-specific-element');
  return (blogTitle !== null);
}
Please don’t forget to replace “.your-blog-specific-element” with a CSS selector. If you are new to CSS selectors, you can find a handy guide here.
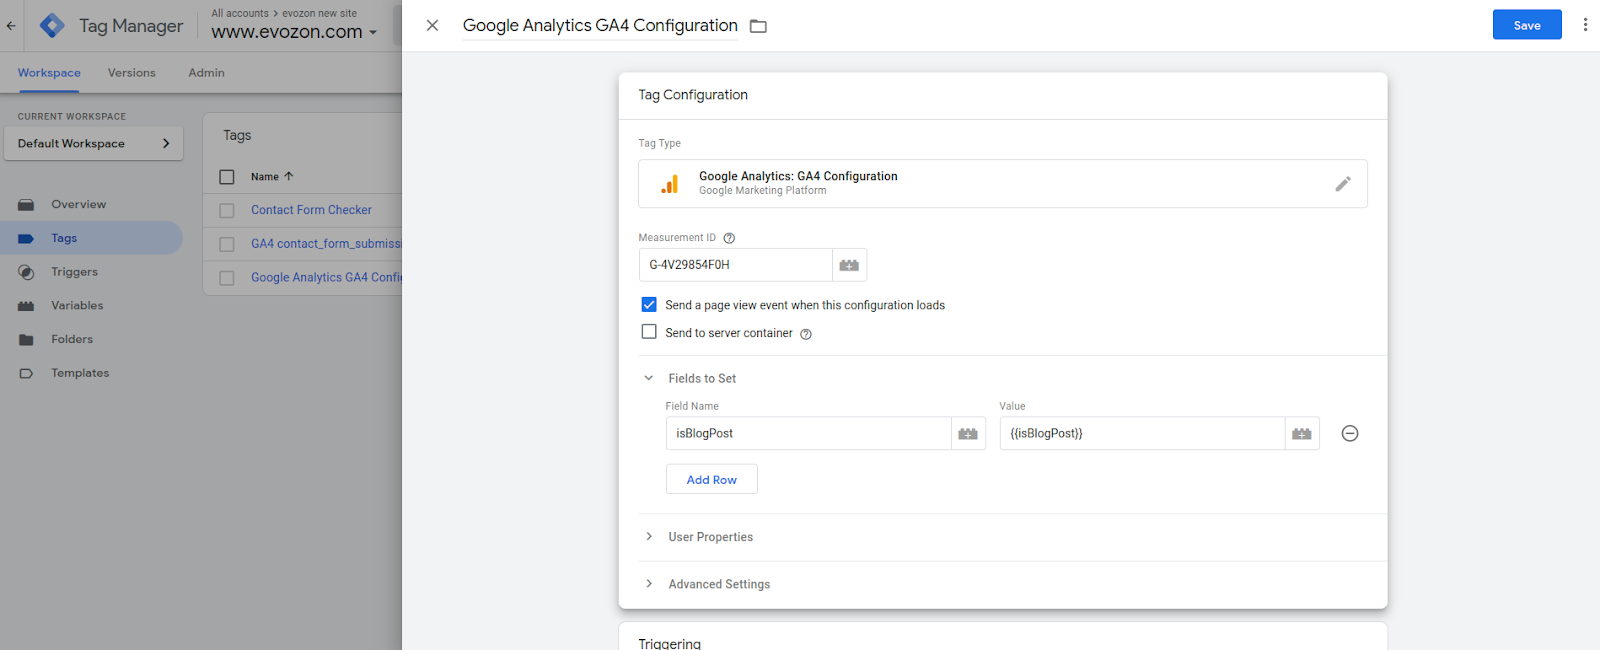
STEP 2: Send the value of the GTM custom variable to GA4 on every page
This will be an easy step since you should already have GA4 implemented through GTM. Go to GTM > Tags > Google Analytics GA4 Configuration (this tag loads GA4 on all pages) > Edit > Fields to Set. Here, for “Field Name” you can use whatever name you’d like. But, I’d recommend using the same name as for the variable you created in Step 1.
In the “Value” field you will need to click on the lego icon with a plus sign (now that I think of it, I’m not sure what that icon represents). From the list, select the variable name you created in Step 1. This will automatically insert that variable name in the input field, surrounded by curly braces. And, curly braces mean that the value, not the name of the variable, will be inserted there.
Screenshot from GA4
Once you finish with this, you can test out everything via Tag Assistant before setting the changes live. If you don’t know how to do that, no worries, there’s an excellent guide here.
After ensuring it all works smoothly, use the “Submit” button in the upper right corner of GTM to set your changes live. The flow looks like this: Submit Button > Publish and Create Version > Add Version Name > Publish. Awesome! You’re done with Google Tag Manager. Now, you are sending information from GTM to GA4 about whether each page is a blog post or a simple page. Let’s head over to Google Analytics!
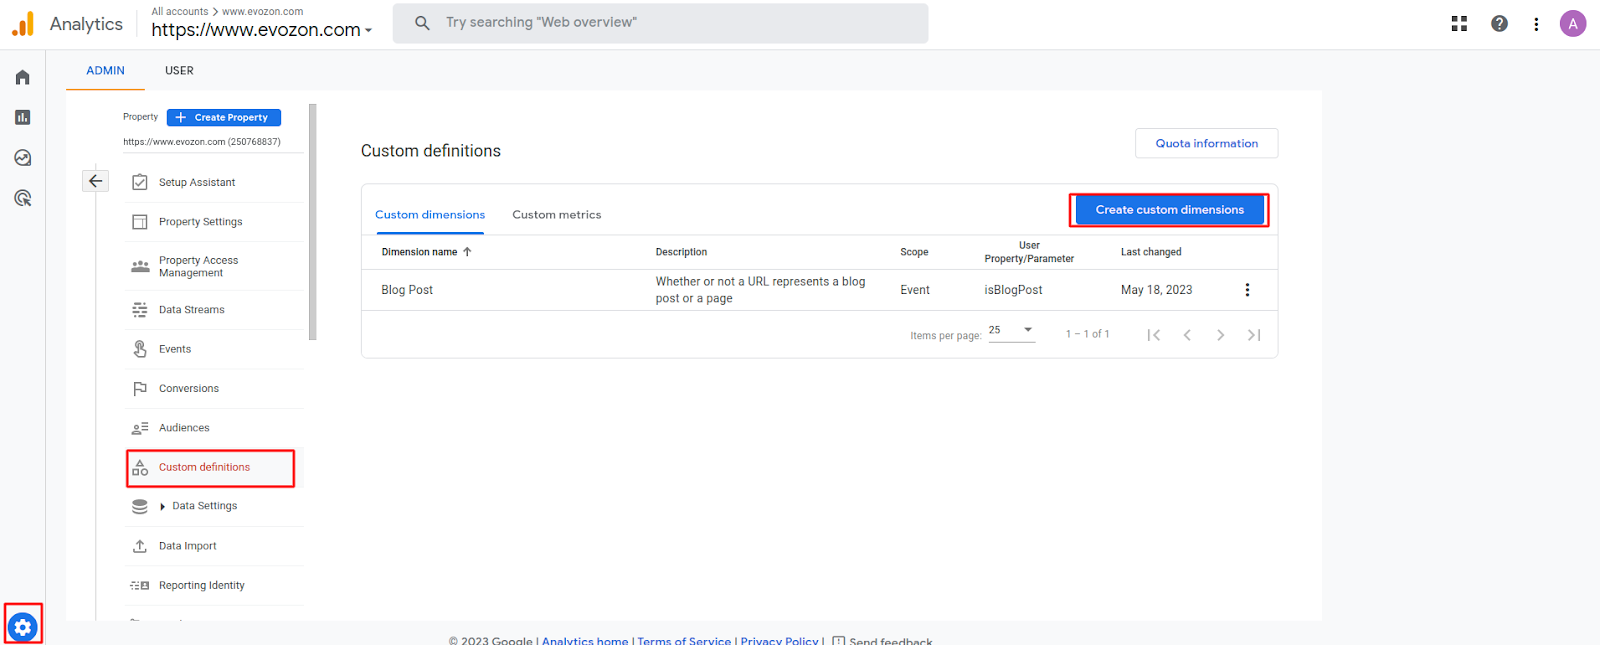
STEP 3: Create a custom filter in GA4 to filter the incoming traffic from your mixed URLs
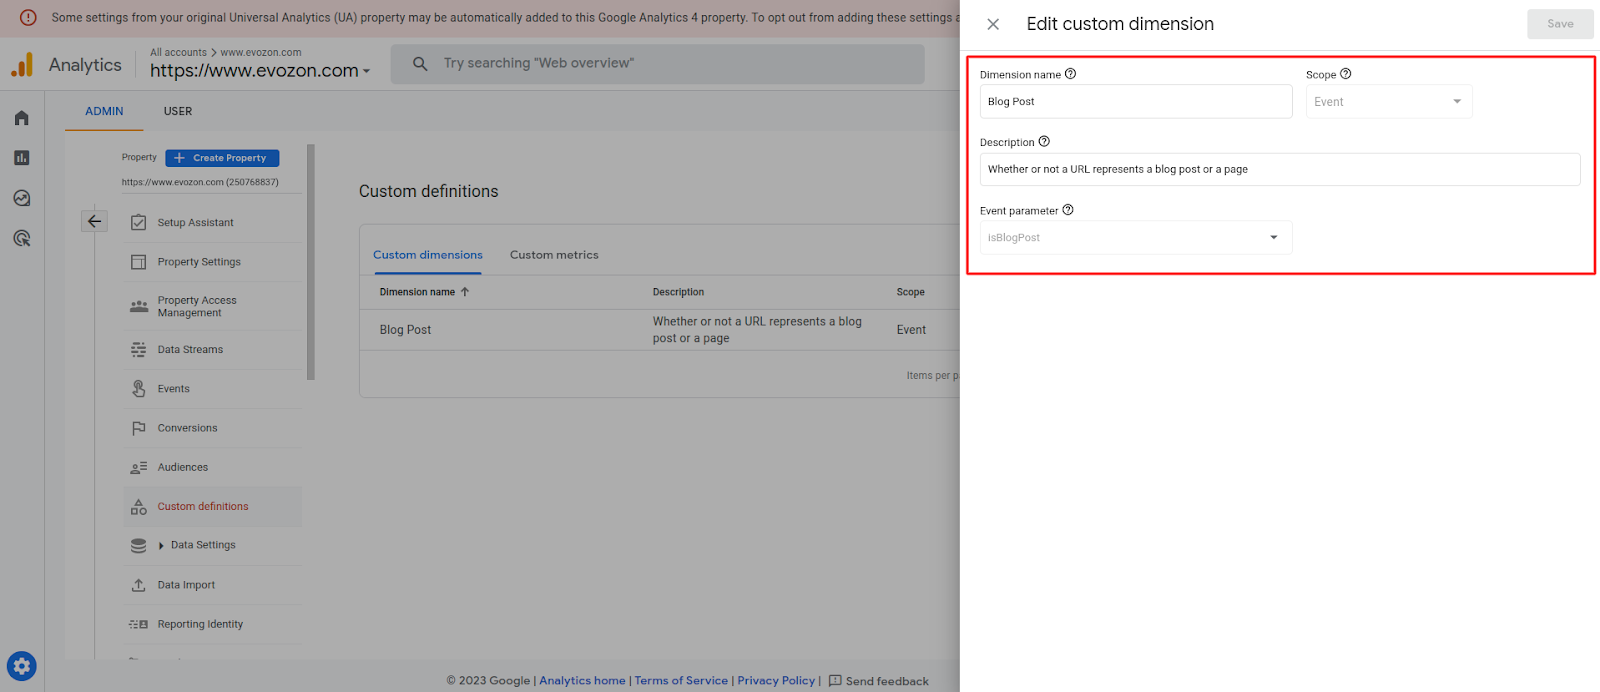
In Google Analytics (GA4), we need to create a custom filter and use it for analyzing data. You can do this by going to Admin > Property column > Custom definitions > Create Custom dimensions. In case you can’t see this button, then you probably don’t have enough rights for the Analytics account. Solve the rights situation, then come back to continue this process.
Screenshot from GA4
Here, you will need to fill out a few fields. In our case, the configuration looked like this:
Screenshot from GA4
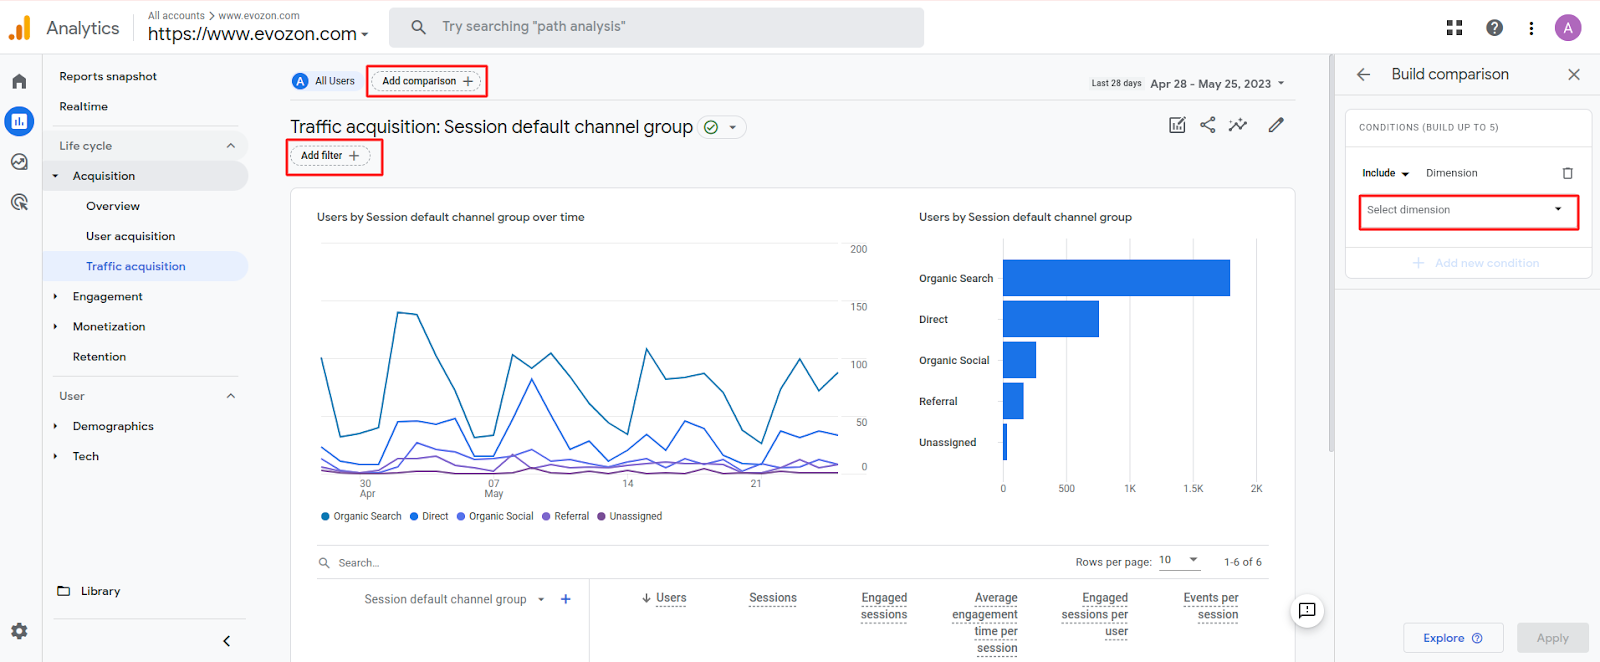
The most important field here is the “Event parameter”. For this, choose from the dropdown the “Field name” you filled out in Step 2 to be sent to GA4 from GTM. And, once this Custom Dimension is saved, you’re done! To be 100% sure everything is set correctly, check if the Custom dimension was created. For this, go to any of the “Reports” and click either on “Add comparison” or “Add filter”. In the “Select dimension” dropdown, you can look up the name of the Custom Dimension you just created. Found it? Then, you’re all good.
Screenshot from GA4
Also, don’t worry about the “Dimension values” for now. Google Analytics (GA4) has not yet received sufficient data to give you a list of Dimension Values it received from GTM. However, if you check back in the following days, this should be filled.
STEP 4: Sit back, relax, and enjoy the data collection of your mixed URLs in GA4
Now it’s time to relax now and let Google Analytics (GA4) do its magic with data collection. Check back after 24-48 hours, and you should be able to create filters in GA4 with the data received from GTM. It should look something like this:
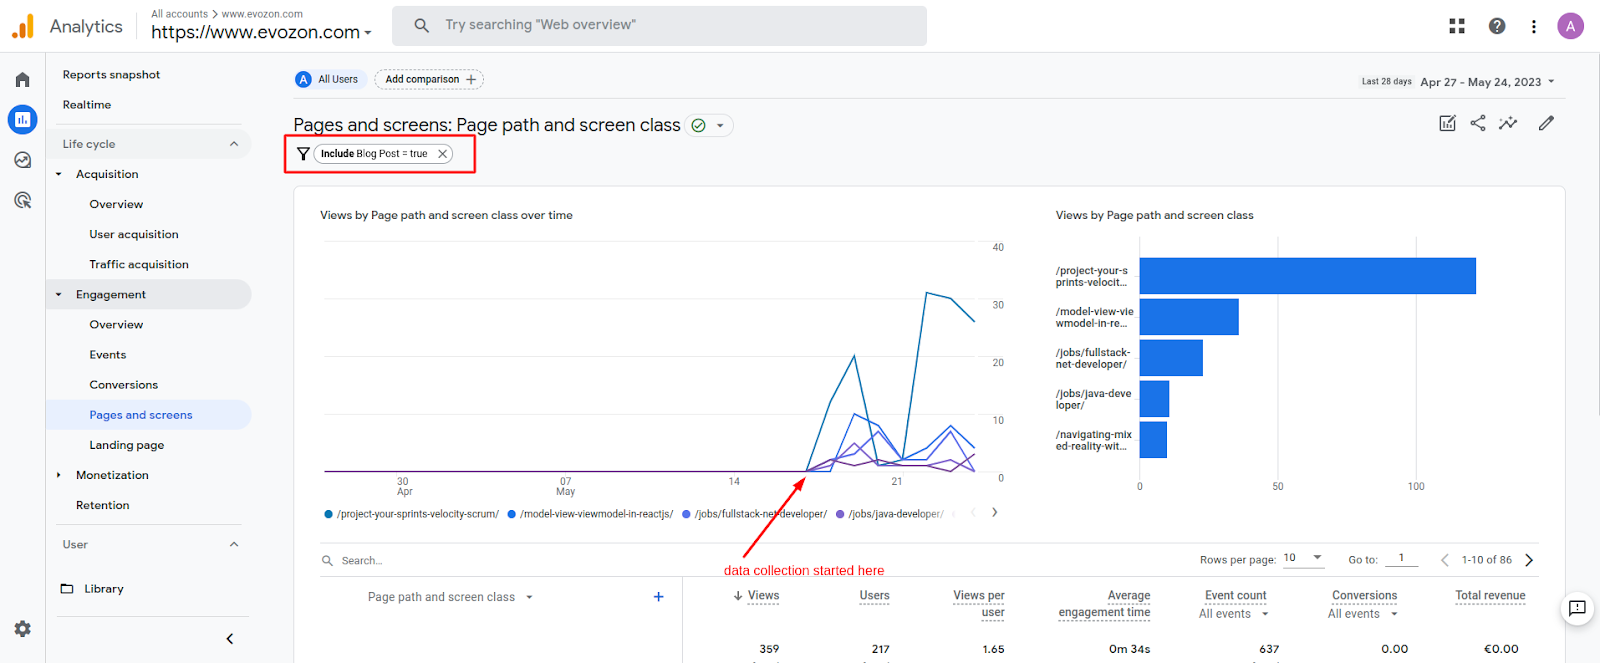
Screenshot from GA4
Enjoy your data! If you have any questions related to monitoring your blog post traffic in GA4 when faced with mixed URLs (or any other GA4-related question) or if you want to share your experience, don’t hesitate to write us (or to me directly, here).
Article written by Andrea Marginean