A tutorial on how to build a distributed load testing infrastructure with AWS, Docker, and JMeter.
Before we get into the tutorial hands-on, I would like to mention that this topic is not new. It has been covered in various helpful articles like the ones from TestAutomationGuru.
The content which I am about to present has its custom favors and solves specific issues that I have encountered while working with this setup.
Table of contents
Overview and scope
Prerequisites
Part 1: Local setup
Step 1: Create an image from a dockerfile
Step 2: Create a container from an image
Step 3: Push/pull images to dockerhub or any private docker repo: (after docker login in CLI)
Part 2: Cloud infrastructure
Step 4: Creating a security group:
Step 5: (Optional) Creating an IAM policy:
Step 6: Install docker on the test machines
Step 7: Configure the Master node
Step 8: Configure Slave nodes
Step 9: Run Script in Distributed Mode
Conclusions
Overview and scope
The scope of this document is to offer a step-by-step tutorial on how to create a distributed load testing infrastructure using AWS EC2, Docker and JMeter.
After all the steps will be done, the resulting infrastructure will look like this:
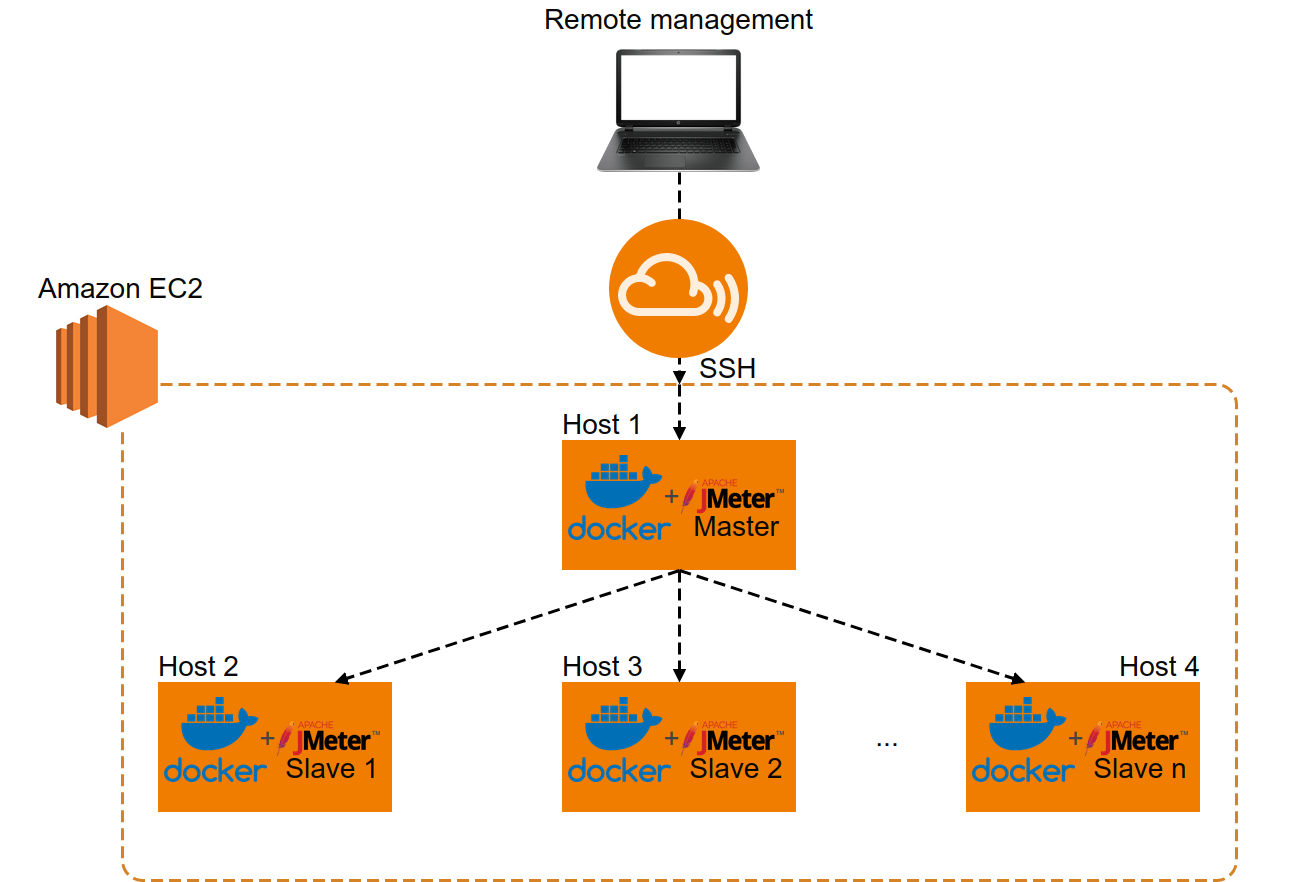
In ‘Part 1’, we are going through the steps required to create your own custom JMeter Dockerfiles and images tailored to your needs.
Then, during ‘Part 2’ we are going to use those elements in the AWS EC2 setup. So let’s get started with the first step.
Prerequisites
Some basic knowledge of each of the systems mentioned above (EC2, Docker & JMeter) is required to be able to transition from one step to another.
Also, an active AWS account is required to be able to follow through with all the steps.
Part 1: Local setup
Step 1: Create an Image From a Dockerfile
The dockerfile is the basic element or the ‘cookbook’ required to be able to start using docker, so we will start with this.
There are 2 layers we need to build:
- A base layer, which creates the elementary setup required to run a JMeter instance.
- Another layer on top of the base which can either be a JMeter master or slave instance depending on our needs
The Dockerfile and entry-point. sh script for the JMeterbase image would look something like this:
Dockerfile:
Entrypoint.sh:
On top of the base layer, you can create a Master layer and a Slave layer. These Dockerfiles can be customized according to your specific requirements.
Dockerfile for the Master layer:
Dockerfile for the Slave layer:
Entrypoint.sh for the Slave layer:
We will not go through what everything in the dockerfiles means, there’s plenty of documentation on that on the internet. What is worth mentioning though are the entrypoint shell scripts, which are bundled with the Dockerfiles.
The role of docker entrypoints is to initialize/configure data into a container at runtime. In our case, we need them to specify how much memory JMeter is allowed to use and also to start the JMeter server preset with some custom configs required for our infrastructure to work. This will be exemplified in the ‘Create container from image ’ section.
Now let’s go through the command needed to create Docker images. As a side note, a Docker image represents a set of layers that ideally integrate well together and are a stable snapshot of the environment we need. Starting from such an image, we can spawn N containers which is precisely what we need in this specific scenario depending on the load we want to emulate.
Command to create a plain docker image:
Create a tag for a docker image:
Create an image and tag at the same time:
Step 2: Create a Container From an Image
Now that we have our image ready, we can start creating containers from it where we can run performance scripts.
To create a new container:
To start/stop a container:
To access a running container:
If you’ve followed this far using similar Dockerfiles as the ones presented during ‘Step 1’, you should have a fully working container with Java + JMeter. You can test this by checking the tools version to see if there are any errors or even by trying to run the script you plan to scale in AWS (all this should be done inside the working container):
Step 3: Push/Pull Images to Dockerhub or any Private Docker Repo
Once you’ve tested that the created image meets the required criteria (everything worked inside the container), it’s generally a good idea to save this image to a repository. Then, you can just pull it from there whenever you need it without having to build it from a Dockerfile every time.
Push image to dockerhub:
Pull an existing image (a JDK image for example) from dockerhub:
After getting to this point, it means that you have a set of functional JMeter slave and master images ready for the cloud setup.
Part 2: Cloud Infrastructure
After the warm-up from ‘Part 1’, things get interesting as we start working with the EC2 instances.
You can use the EC2 free tier instances for up to 750 hours/month for 1 year so that’s a lot of time to experiment.
Note that for the examples provided below, I have used ‘ Ubuntu Server 18.04 LTS’ instances, so the provided command might not work on other Unix distros.
Step 4: Creating a Security Group
To enable JMeter instances (master or slave) inside the containers to communicate, a custom security group has been defined and attached to each host:
Inbound rules:

Outbound rules:

Note: be sure to assign all instances which you want to be part of the load testing infrastructure, to this security group or else they might not be able to communicate with each other.
Step 5: (Optional) Creating an IAM Policy
Let’s assume that you only require an infrastructure comprised of 1 JMeter master node and 2 slaves. In this case, it’s relatively easy to just access each instance and configure it (install docker + spin up the containers).
What happens when you have more than 3 instances you have to work with?
Manually configuring each of them becomes tedious and probably not a good idea anymore. You will need a system which can manage a large number of containers you are working with. Some well-known tools for this are Google’s Kubernetes or the tool called Rancher.
But since we are using AWS, these 2 solutions seem like over-engineering since Amazon offers an out of the box solution for specifically what we need to do.
The ‘Run Command‘ feature allows us to execute shell scripts on multiple EC2 instances at the same time. So we don’t have to access each instance and install docker and start containers one instance at a time.
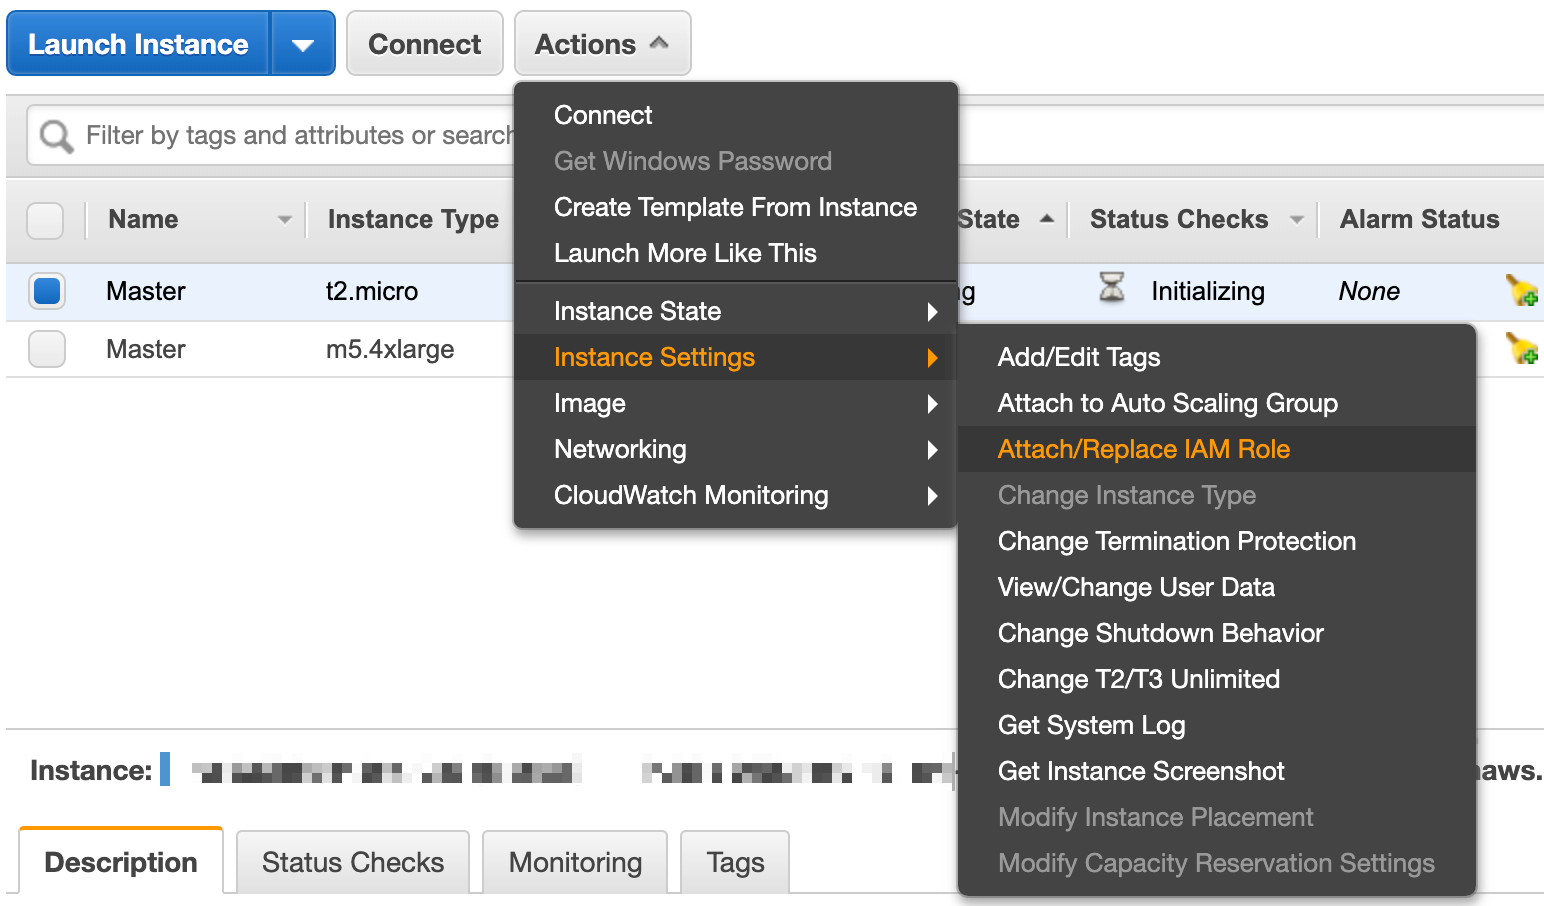
The only requirement for you to be able to execute a command on an EC2 instance via the ‘Run command’ feature is that the appropriate IAM role is associated with the instance. I named my IAM policy ‘EC2Command’ and I’m careful to select it for each newly created instance (but the role can be assigned to the instance later on just as well via the ‘attach/replace role’ function):
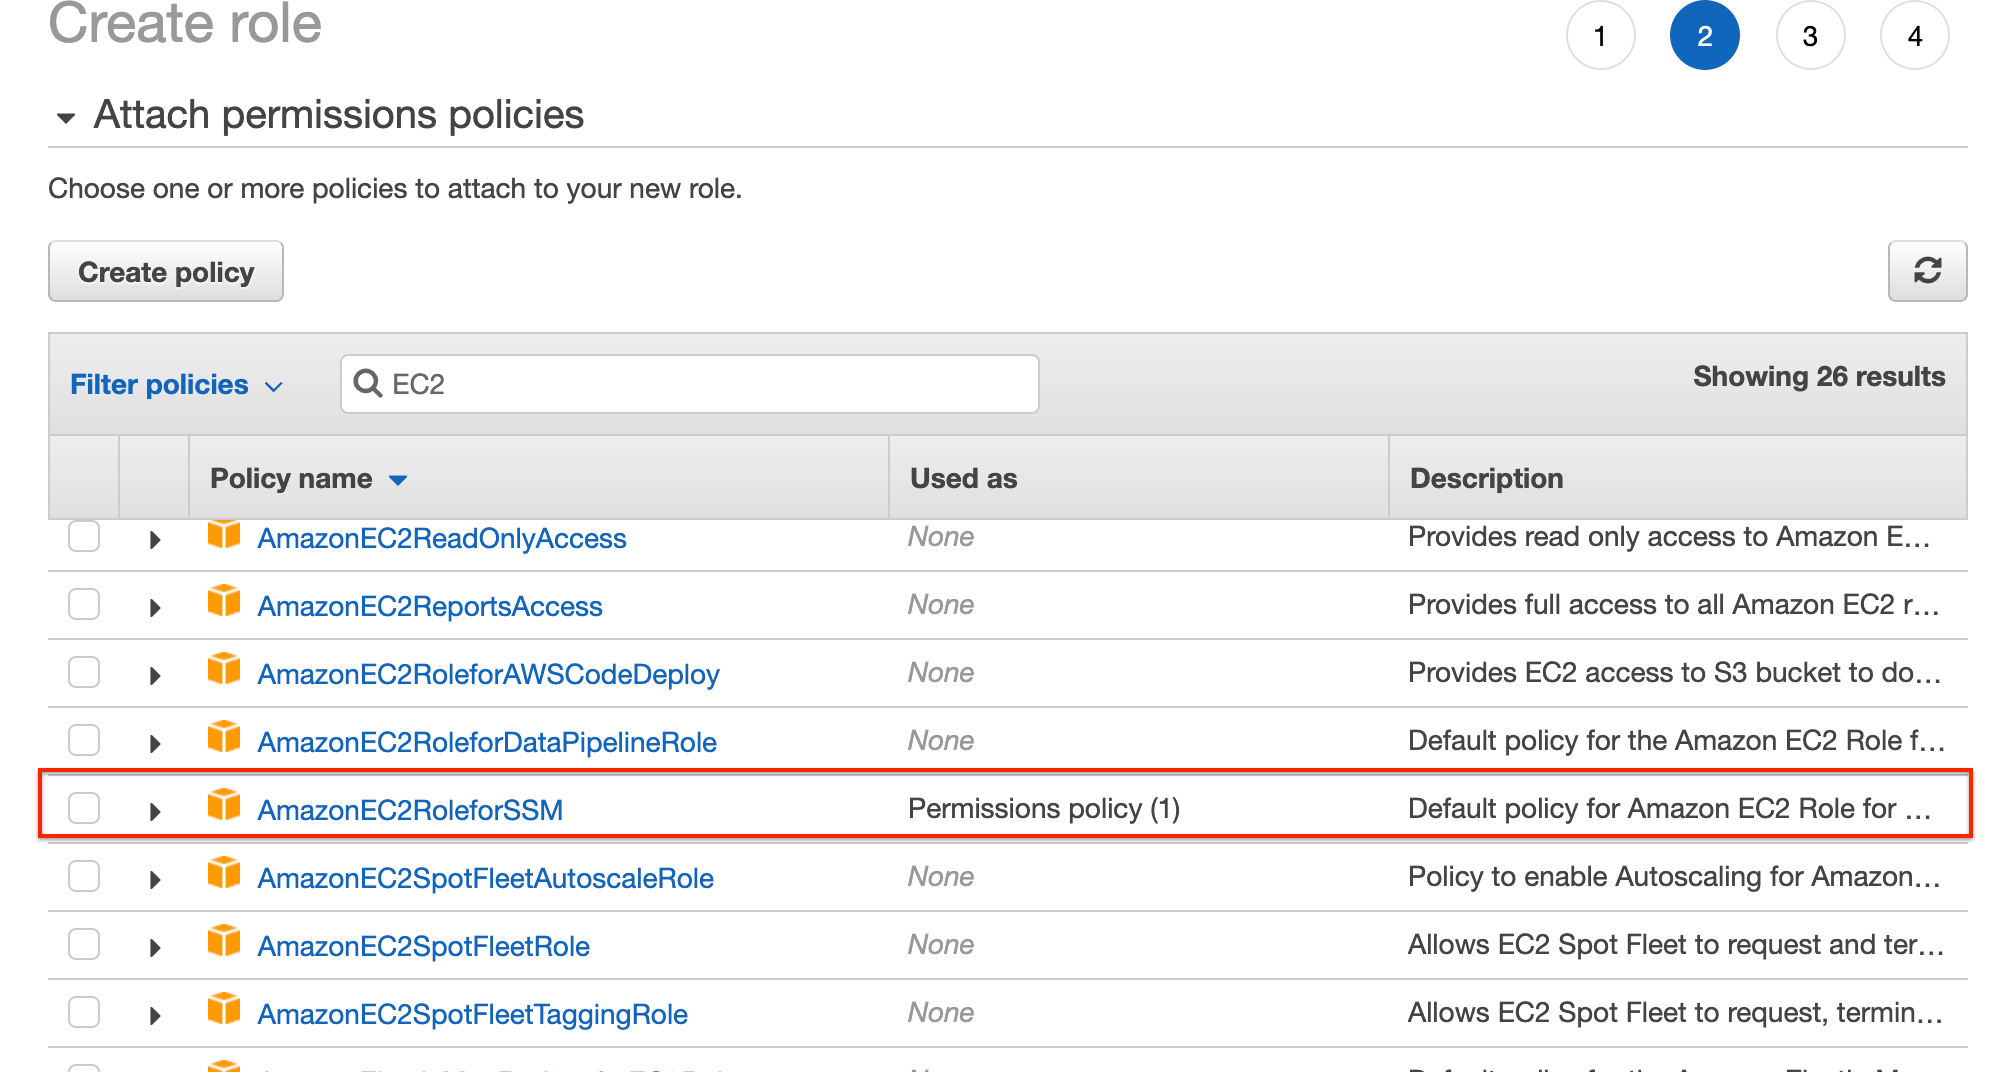
When you create the role, be sure to attach the ‘AmazonEC2RoleforSSM’ policy to your role and you should be good to go.
And that’s it, now you can use the ‘Run command’ feature to execute scripts on multiple instances bulk.
This takes us to the next step of the process.
Step 6: Install docker on the test machines
You now need to install Docker on your EC2 hosts so you can start spinning containers and connecting them for the distributed load test.
Direct command (executed directly in an instance’s terminal on Ubuntu):
Shell script to execute via ‘Run command’:
Ideally, you would run this second script on multiple EC2 instances after which they will all have a working version of Docker. After this is done, the next step is to configure the master and slave nodes:
Step 7: Configure the Master Node
In some situations, you might not even need multiple slave nodes to run your tests distributedly. This applies when you have a powerful host machine and that machine is enough to generate the target load. So for this specific case, steps 8 and 9 are not required. For this situation, you might not even want to use a container and install JMeter directly on the host.
Let’s imagine you do need a Master + Slaves system and proceed to launch the Master container:
Direct command (executed directly in an instance’s terminal on Ubuntu):
Shell script to execute via ‘Run command’:
The first line of the script stores the machine’s private IP in the variable ‘HostIP’. The master’s HostIP is not used for anything, only the HostIPs for the slave nodes will be used. We will see exactly what for at step 9. For now, keep in mind that you have quick access to the host’s private IP address inside each container.
The next line is straightforward and just fetches the image from the appropriate repo.
The last line creates the container we are going to use. There are a few points worth going over in this command:
- The ‘–network host’ command enables host networking which means that applications inside the containers (JMeter), will be available on the ports which were exposed in the ‘entrypoint.sh ’ script. Other tutorials did not use this setting (like the great tutorial from TestAutomationGuru), but I could not get the setup to work without it. The issue was that even though the script was being executed on the slave nodes, no results were aggregated on the master node because of an error (‘java.rmi.ConnectException: Connection refused to host:masterPrivateIP ’). Note that I did not encounter this issue with older versions of JMeter like 3.x . x.
- ‘– e Xms=256m -e Xmx=512m -e MaxMetaspaceSize=512m’ is parameterization of the Xms, Xmx, and MaxMetaspaceSize which dictates the amount of memory JMeter is allowed to use. This is done by first setting some environment variables inside the container. Then, running the command inside the ‘entrypoint.sh ’ script which changes the ‘JMeter’ file found inside JMeter’s ‘/bin’ folder. If these values are not specified, a default is used.To give a bit more context on what these variables represent and how to set them, read the following:The Xmx value for a machine that generates the load for your tests can be calculated as follows: Total system memory – (memory used by the OS + memory used by the JVM + any other scripts required to run on the machine). If you have a dedicated machine for testing, to avoid reallocation of the Xms during testing runtime, set the Xms = Xmx from the beginning.The MaxMetaspaceSize keeps track of all loaded class metadata and static content (static methods, primitive variables, and references to objects).For example, on a dedicated machine with 64 GB RAM, the Xmx = 56G, Xms = 56G, and MaxMetaspaceSize = 4096 MB. This leaves almost 4GB remaining for the OS and other processes which is more than enough.
- The ‘-v /opt/Sharedvolume:/opt/Sharedvolume userName/repoName:imageTag ’ command just maps a folder on the host to a folder inside the container where you will have the script files and generated logs. We are not going to detail this any further but if you want to find out more about volume mapping, see this article and mini tutorial.
Step 8: Configure Slave Nodes
The ‘HostIP ’ variable is only used here in the ‘entrypoint.sh ’ script to enable remote access from the master to the slave (‘-Djava.rmi. server.hostname=$HostIP ’).
Direct command (executed directly in an instance’s terminal on Ubuntu):
Shell script to execute via ‘Run command’:
Step 9: Run Script in Distributed Mode
Now we should have everything ready to start running our tests. Here is the command which we need to run on the master node to start running the distributed tests:
Conclusions
This is pretty much it! I don’t know what will change in the future when it comes to Java or JMeter or the other tools required for this setup, but at the time of writing this, following the above steps would result in you having a functional setup for distributed tests using JMeter, Docker, and AWS EC2.
This does not mean that you will not encounter any issues. From what I’ve noticed working on various performance projects and from insights from colleagues working in the same field, specific problems will arise for most projects.
For example, this article mentions issues you might encounter when it comes to having too many Websocket connections from one EC2 instance.
Another example would be the situation which a colleague of mine encounter when he was load testing an Apache server and he would get all kinds of connection errors in JMeter which we initially thought came from the server under test. It turned out that these appeared because of the configuration of the test machine. The solution to fix this came from this short article.
One issue I have stumbled across on one of my projects was with some data-driven tests while trying to execute about 20000 threads from one machine. If you type ‘ulimit -a‘ in a Linux/ MacOS terminal, you see a line named ‘open files’. The issue was that this attribute was set to 1024 on the test machine. When running data-driven tests with JMeter, this tool will open the .csv file or a descriptor for every started thread and I would get an error as soon as the number of parallel threads exceeded 1024. The solution was to edit the ‘open files‘ maximum from the ‘/etc/security/limits. conf‘ file and set it to ‘unlimited‘.
There are a plethora of problems you might encounter, and there is no fixed recipe to fit all project so when you encounter one, you need to do your research and resolve that issue.
If you’ve had any specific issues in a similar setup, please mark them in the comment section together with how you fixed them, it will probably help the readers and community get an idea of what they might encounter or even solve existing problems.
Thanks for reading!
– Dragos Campean
Originally published on Dzone.com