
This article is a short tutorial on how you can create your own highly configurable web crawler using the open-source application JMeter. The article covers a few sections:
- What are web crawlers?
- The testing context where I needed to use one
- Step-by-step guide on creating the script
- Approach breakdown (advantages/ disadvantages)
What are website crawlers?
Website crawlers come in different shapes and sizes and are also known as web spiders, bots or robots, indexers, or web scutters. These bots are automated scripts that browse through websites on the internet in a systematic way.
Crawlers consume resources on the visited systems and often do so without approval. They are sometimes associated with a negative context. For example, the OWASP Zed Attack spider can be used by hackers who can map out an entire website and get an accurate idea of all its functionalities in a matter of minutes. In a similar manner, this app can also be used by cyber security specialists to help reveal vulnerabilities of a site before they are exploited but that is another story. Apart from this, spiders can also be used for data mining, web scraping, and website indexation so that the search engines we use return the most relevant data to us.
There are lots of open source applications available on the web which can do website crawling.
Why use JMeter to do it then? you may ask.
The quick answer is that JMeter is more suitable for this task in certain contexts than other applications might be.
The testing context where I needed to use one
Such an example is something I had to do recently where a live website let’s call it www.MyExampleSite.com was rewritten completely and was available at www.staging.MyExampleSite.com. The problem was that the initial site was really old and had a very large number of pages. The task was to check if all the relevant resources from the initial site were available in the new site. So, let’s say that the the initial site had a particular page like www.MyExampleSite.com/the/path/i/want and the task was to check that the path used in the new site by accessing www.staging.MyExampleSite.com/the/path/i/want, would redirect me to a valid resource. If the page didn’t respond with 404 and the response was instead 200 or 301(redirect), the test was a success.
Ok, so, one page down, a few thousand more to check. This was in no way something to do manually so i started looking for ways to automate the task. My plan was simple: get a list of all URLs from the initial site, extract only the paths of each URL and then build requests in JMeter using the new domain (the staging environment) + the extracted paths. So first I need a list of all the subpages in the site.
The first idea was to crawl through the initial site using the crawler Xenu. The problem here was that Xenu returned a list of 40 000 links and the filtering options were limited.
The second approach was to use the OWASP Zed Attack spider. This app offered some more advanced filtering options. I could define some regular expressions so that only the URLs I was interested in would be returned. I could also set a timer between the requests Zap made so that I don’t accidentally kill the server (which was old as well). All I had to do now was print a list of all the found results, which were 10 000, and then iterate through them using JMeter.
This was doable but as we ran the scripts, more filtering requirements appeared and I decided that it would be a more elegant approach to do everything in one place, not use multiple apps.
So I tried writing everything in JMeter. It worked!
The start was a bit slow because I didn’t know how to approach the matter.
While searching for resources I stumbled upon an excellent article by Dmitri Tikhanski (who has a strong presence on the bazemeter.com blog, which address a lot of advanced topics regarding JMeter and load testing in general) where he was doing something similar.
My only issue with the approach presented in the above mentioned article was that it had increased complexity and used lots of elements (various JMeter controllers and different extractors). Also, from what I could tell, you had to manually set a maximum number of pages your crawler would iterate through. This means that the script might miss some pages.
I wanted to crawl every page from that domain exhaustively and without repeating any page.
So I finally designed my own approach:
Step by step guide on creating the script
Note: For demo purposes, I used the presentation site of the company I currently work for: https://www.evozon.com/. The script which will be created, will generate some load, especially if it’s run by multiple users.
That’s why, I would suggest using your own website, by changing the ‘protocol’ and ‘serverName’ variables to match your site in the ‘User Defined Variables’ configuration element from the script below.
If you do decide to go on and use the Evozon website, please set an appropriate timer between requests.
The initial script which makes a single request to the landing page, which we will start building on can be downloaded from here.
Step 1: Analyze the Home page response data
The Home page will look something like this:
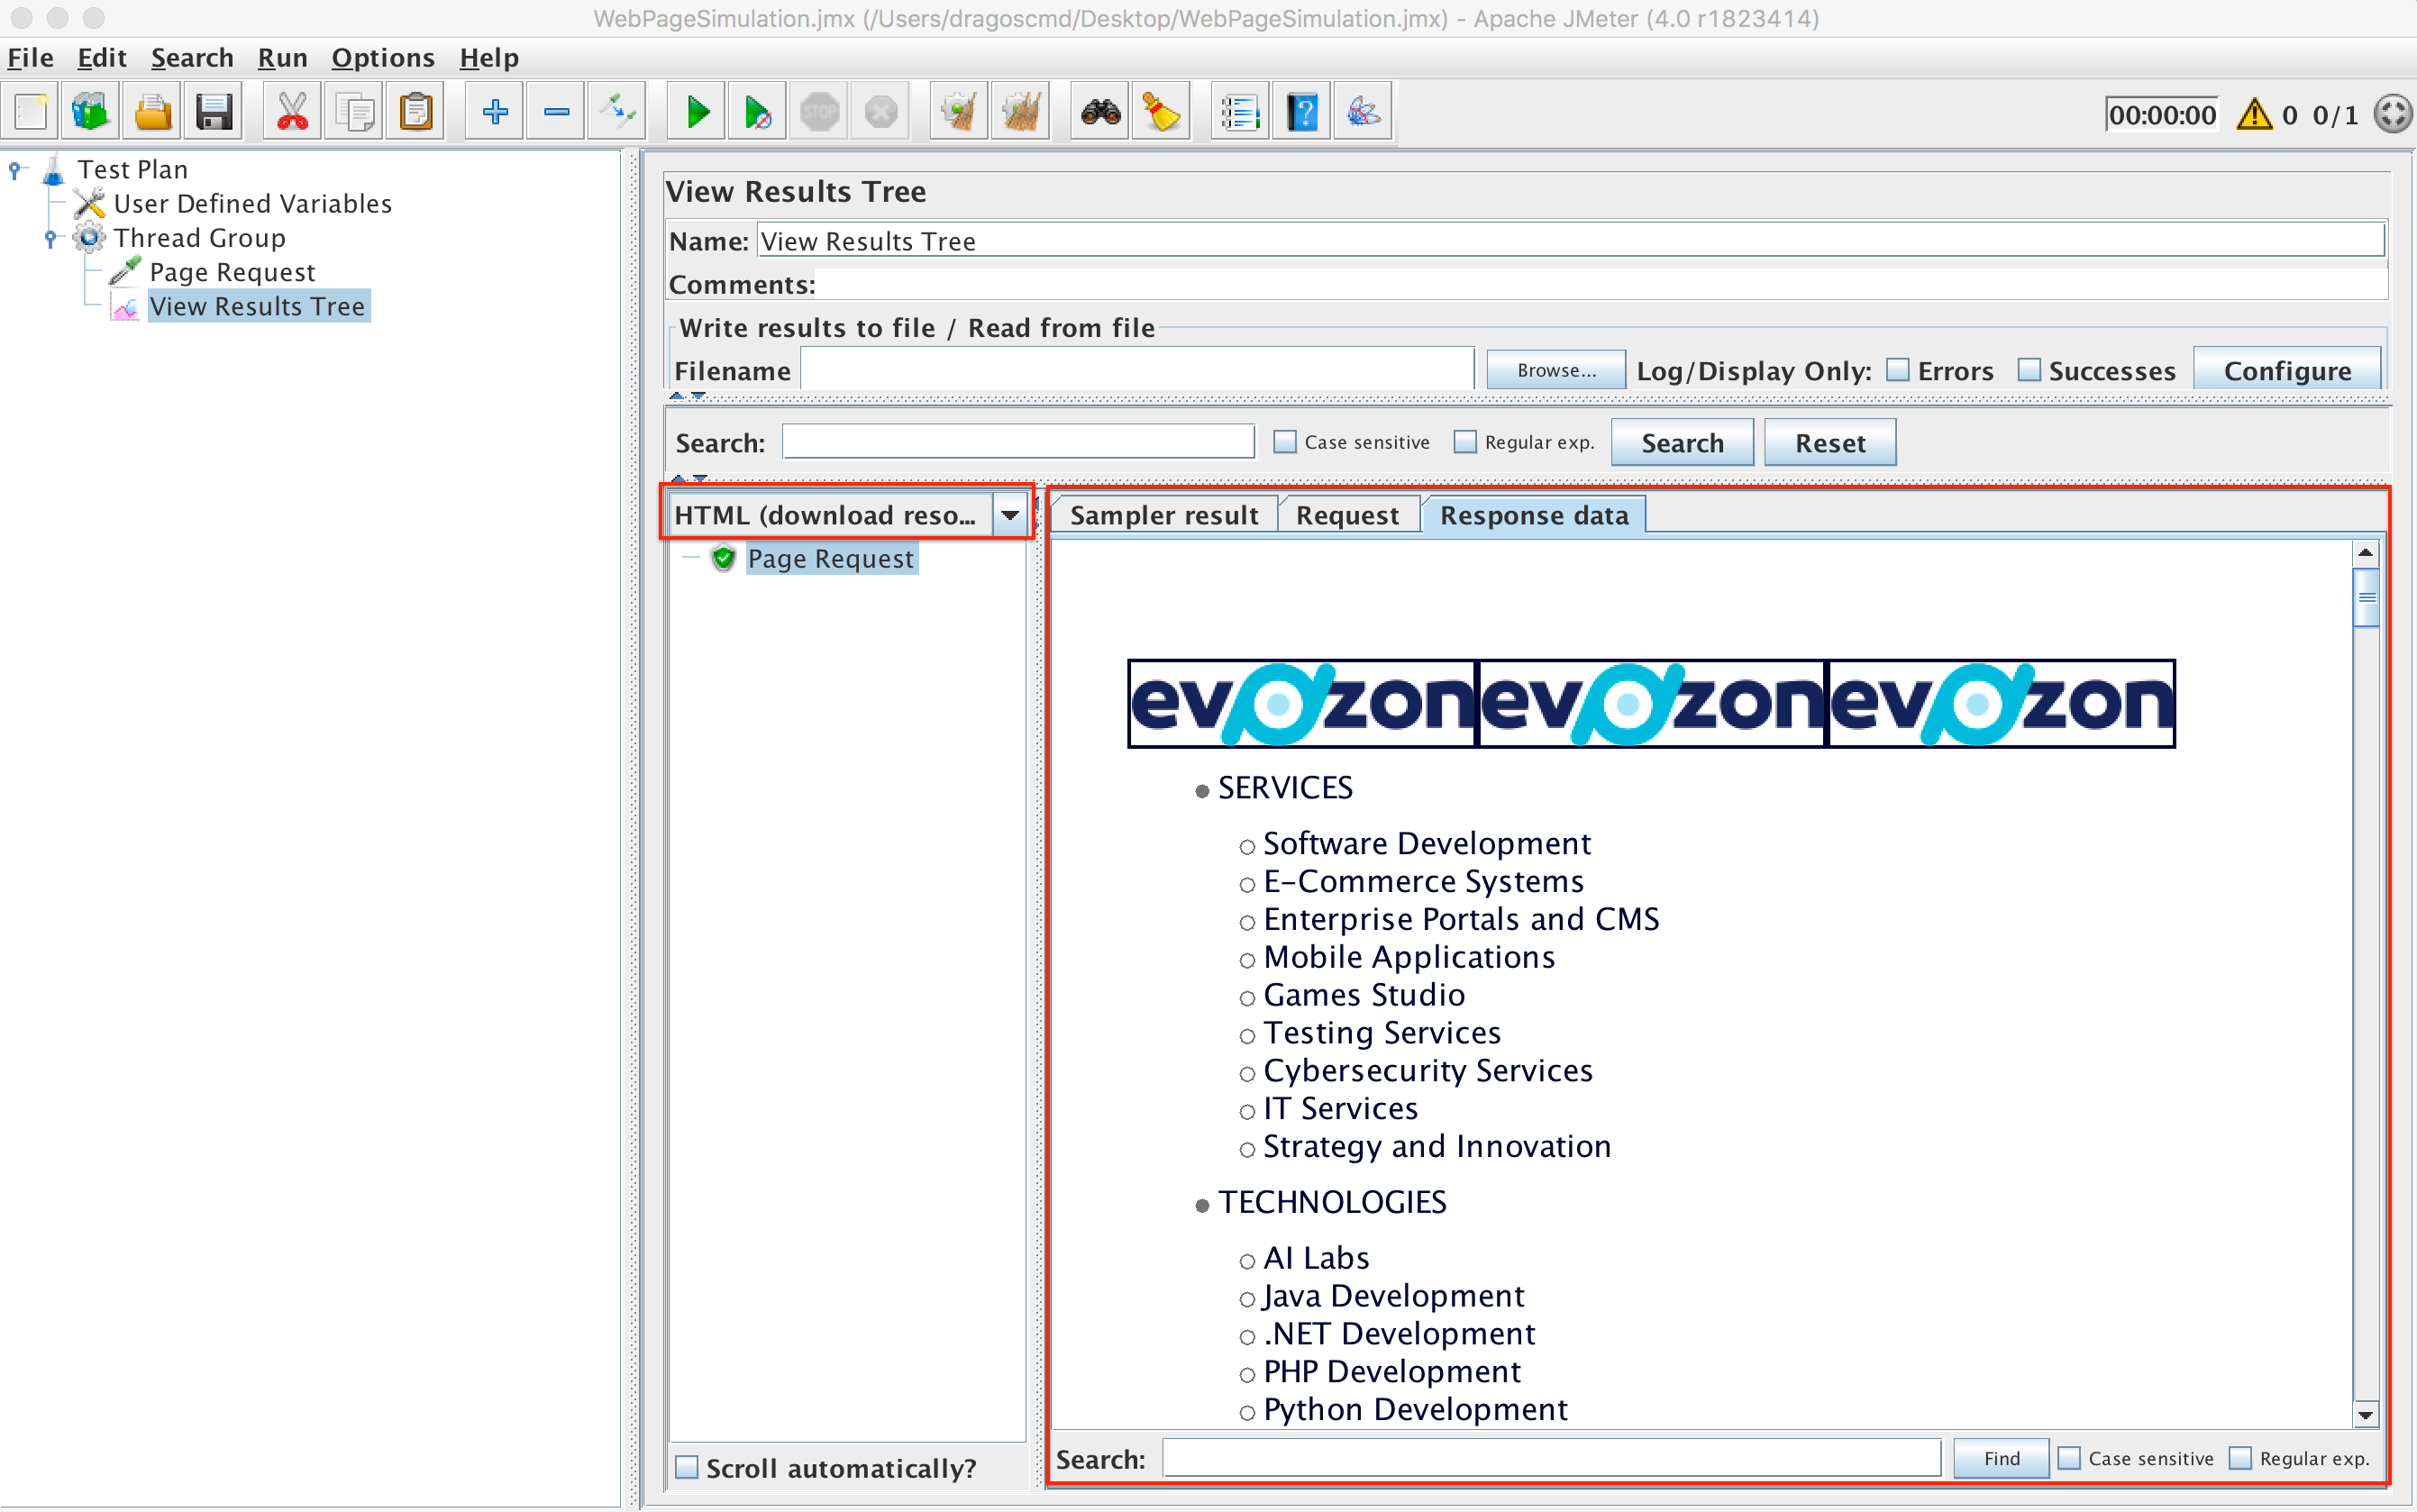
Homepage Request
We can see that the home page contains multiple sub pages (Services, Technologies, Games Studio, etc).
Each one of those sub pages might or might not contain sub pages themselves, and so on, we could keep going deeper until we reach all the pages of the website. That is the issue we must address.
Now that we can see the response of the home page, we must go to:
Step 2: Extract the URL for each sub page
For this, we can use various JMeter post processors like CSS Extractor, Xpath Extractor or Regular Expression Extractor. For this demo we are going to use the latter.
A generic regular expression extractor which gets all the href elements from a page (regex = ‘href=”(.+?)”’) looks like:
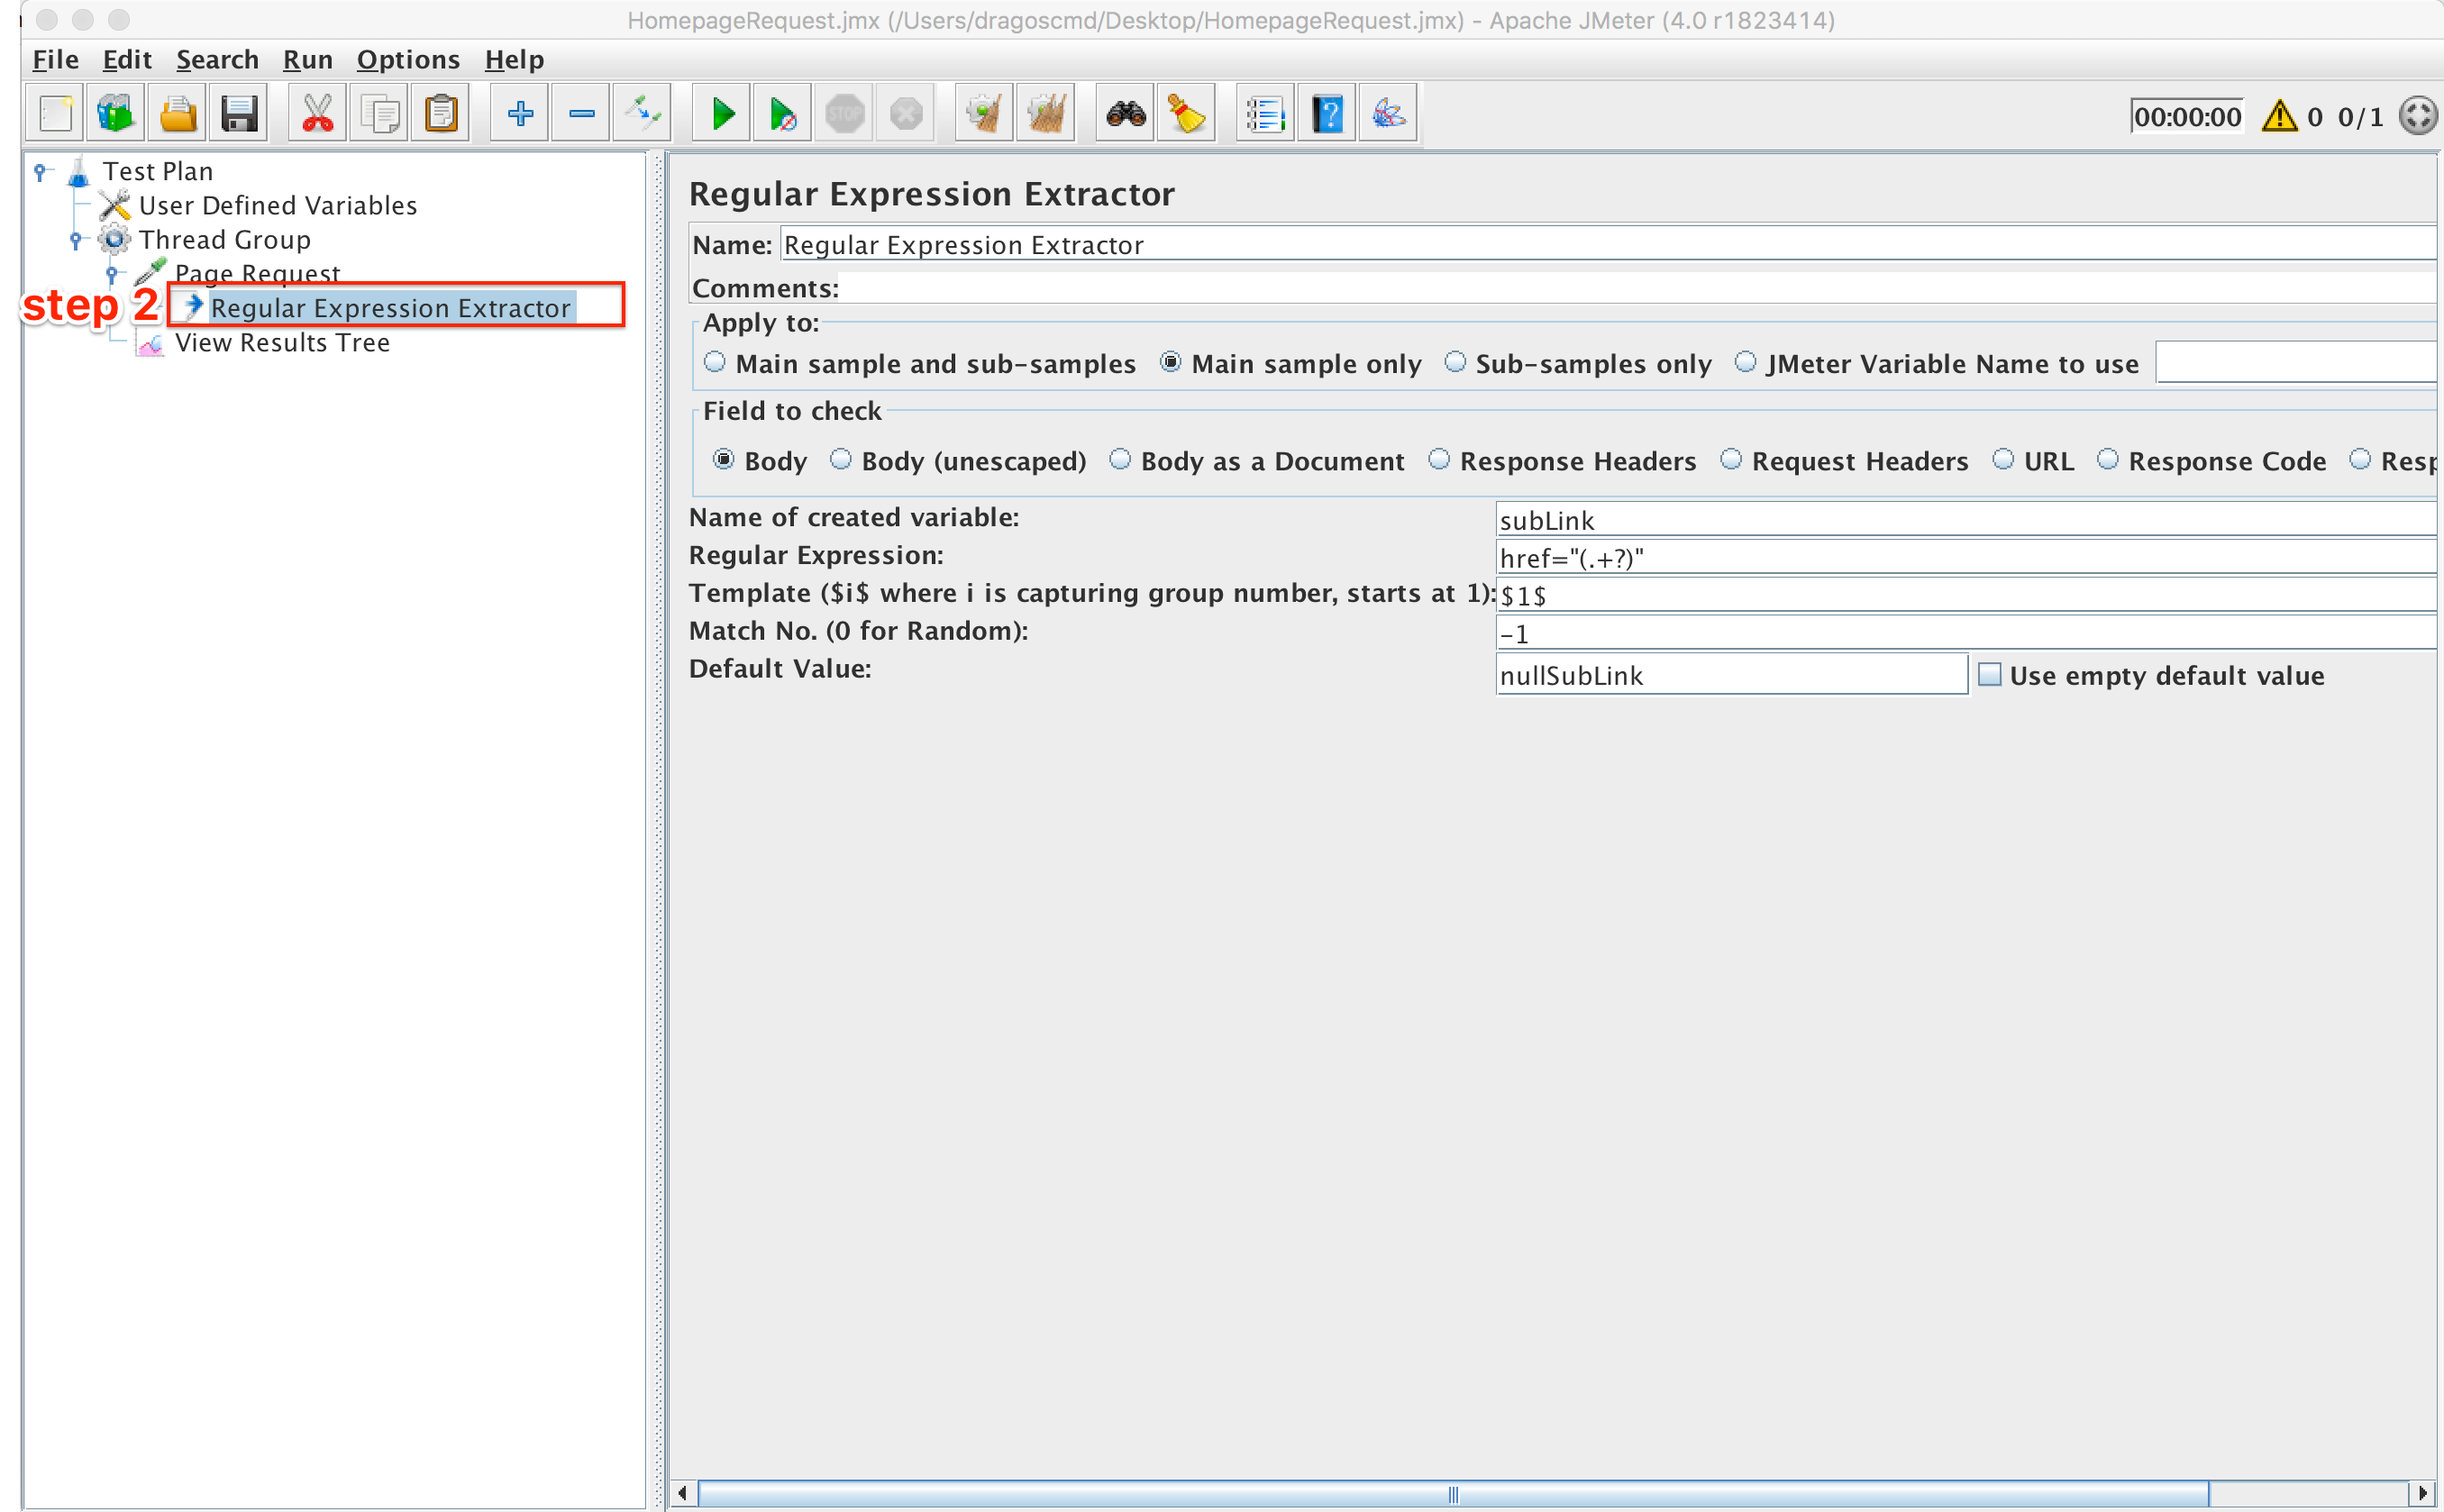
Regular Expression Extractor
This extractor basically creates n variables (subLink_1, subLink_2, …, subLink_n) containing the links for those n pages. It is important to note that JMeter creates an additional variable called subLink_matchNr which stores the total number of URLs found (in this case n). This means that now we have n additional pages we must navigate through and this goes on and on.
Now, some of the URLs might be duplicates. Imagine you have the above request in a loop which is programmed to stop once we iterated through all the URLs. But, one URL will redirect us back to the home page.
This means that we will go back to the beginning and a cycle will be formed which is infinite. We want to avoid that and it is quite simple.
How you might ask?
By using an ArrayList which contains unique elements. This takes us to the next section:
Step 3: Declare and initialize an ArrayList
All the processing we will do from here on will be done with the Groovy language. This is because it is proven that when it comes to JMeter, Groovy is the most efficient programming language to use. Some representative tests in this regard were made by Dmitri Tikhanski and presented in this article.
When it comes to ArrayList processing, from my tests I have concluded that Beanshell is a bit faster than Groovy. To test this I used an ArrayList formed out of 150 000 unique elements (each element being a sequence of 32 random characters). Then I compared another 32-character string with each of the 150 000 elements of the ArrayList, 100 times (using the .contains()method). The average response times for the various languages used were:
Groovy: 220 ms
Beanshell: 199 ms
Javascript: 206 ms
That being said, even if Groovy was not the fastest in this regard it has other major benefits over the scripting language Beanshell.
So, we need to create the ArrayList and initialise it. This will be done before our defined request, in a ‘Data preparation’ element. This element can be a ‘Test Action’ sampler for example, mainly because it won’t show in the view results tree. Also, it should contain a Groovy processor where we will write the appropriate code:
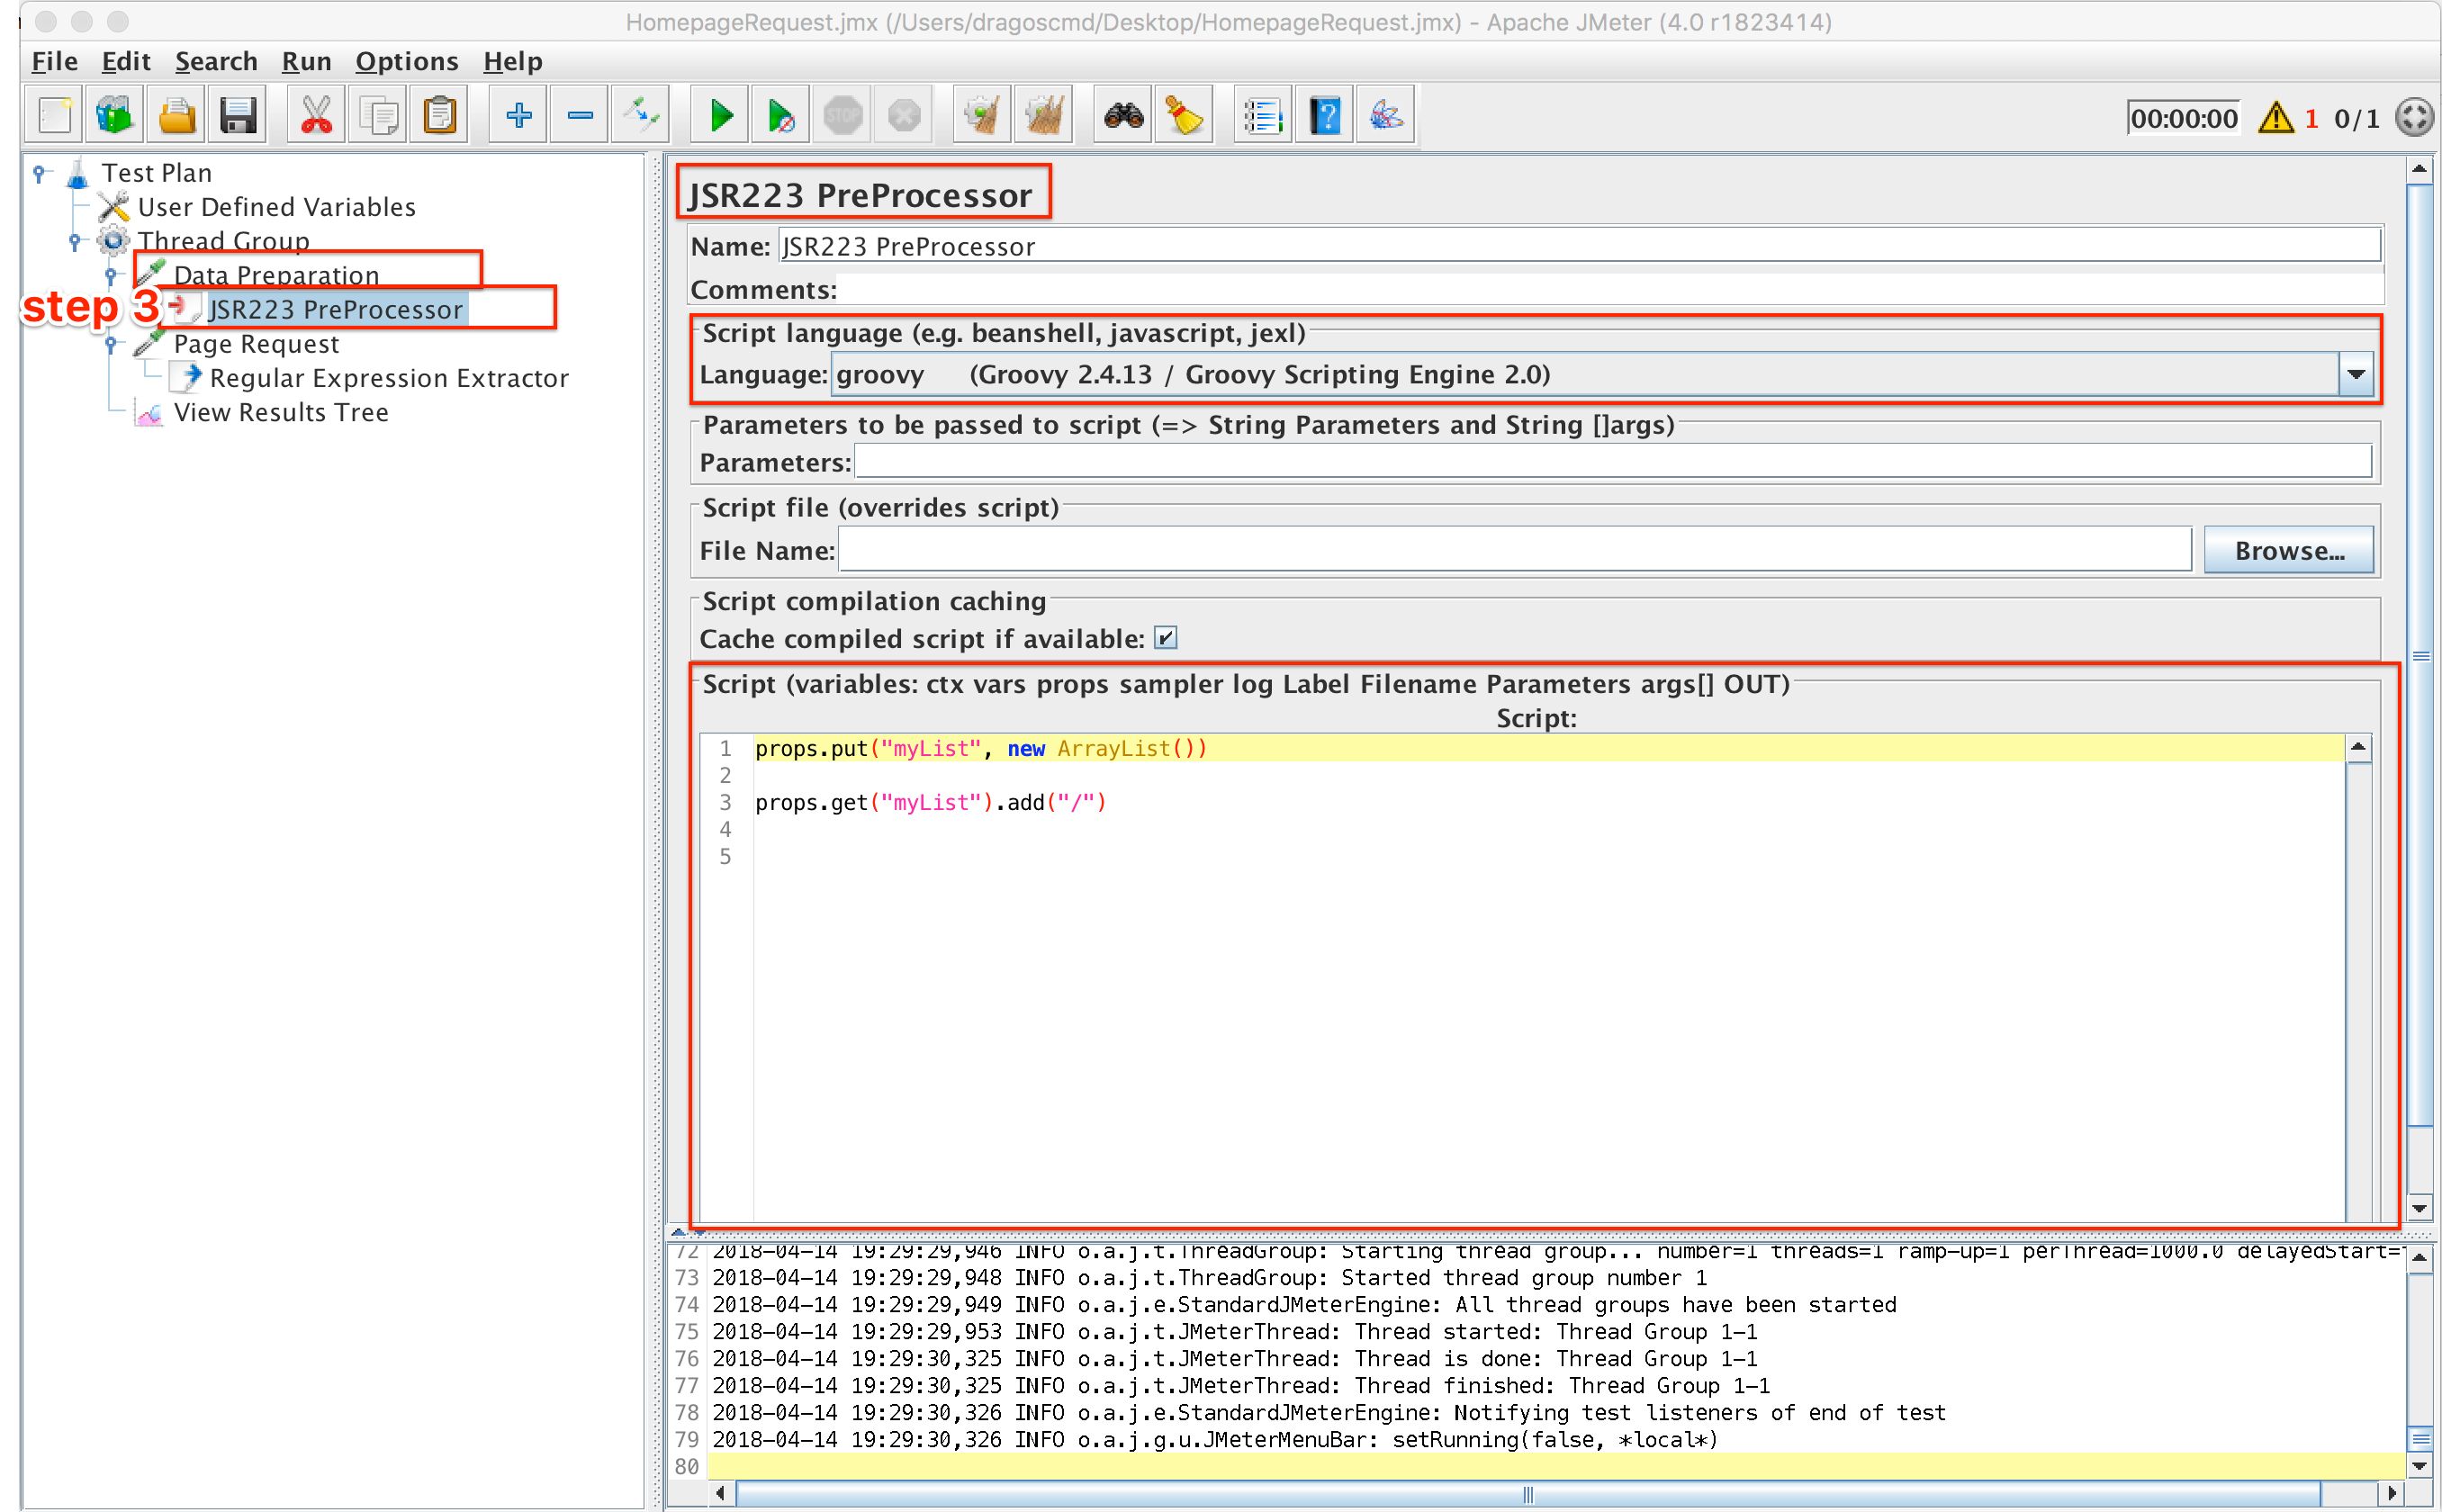
ArrayList Declaration and Initialisation
Since ArrayList objects can’t be stored in JMeter variables, in order to be able to access the ArrayList outside the processor it’s declared in, we need to store it in a JMeter property. This is done as follows:
props.put(“myList”, new ArrayList())
The list will also be initialised with the path to the homepage which is “/”:
props.get(“myList”).add(“/”)
We also need to add the paths we extracted with the regex from step 2 to the list which takes us to:
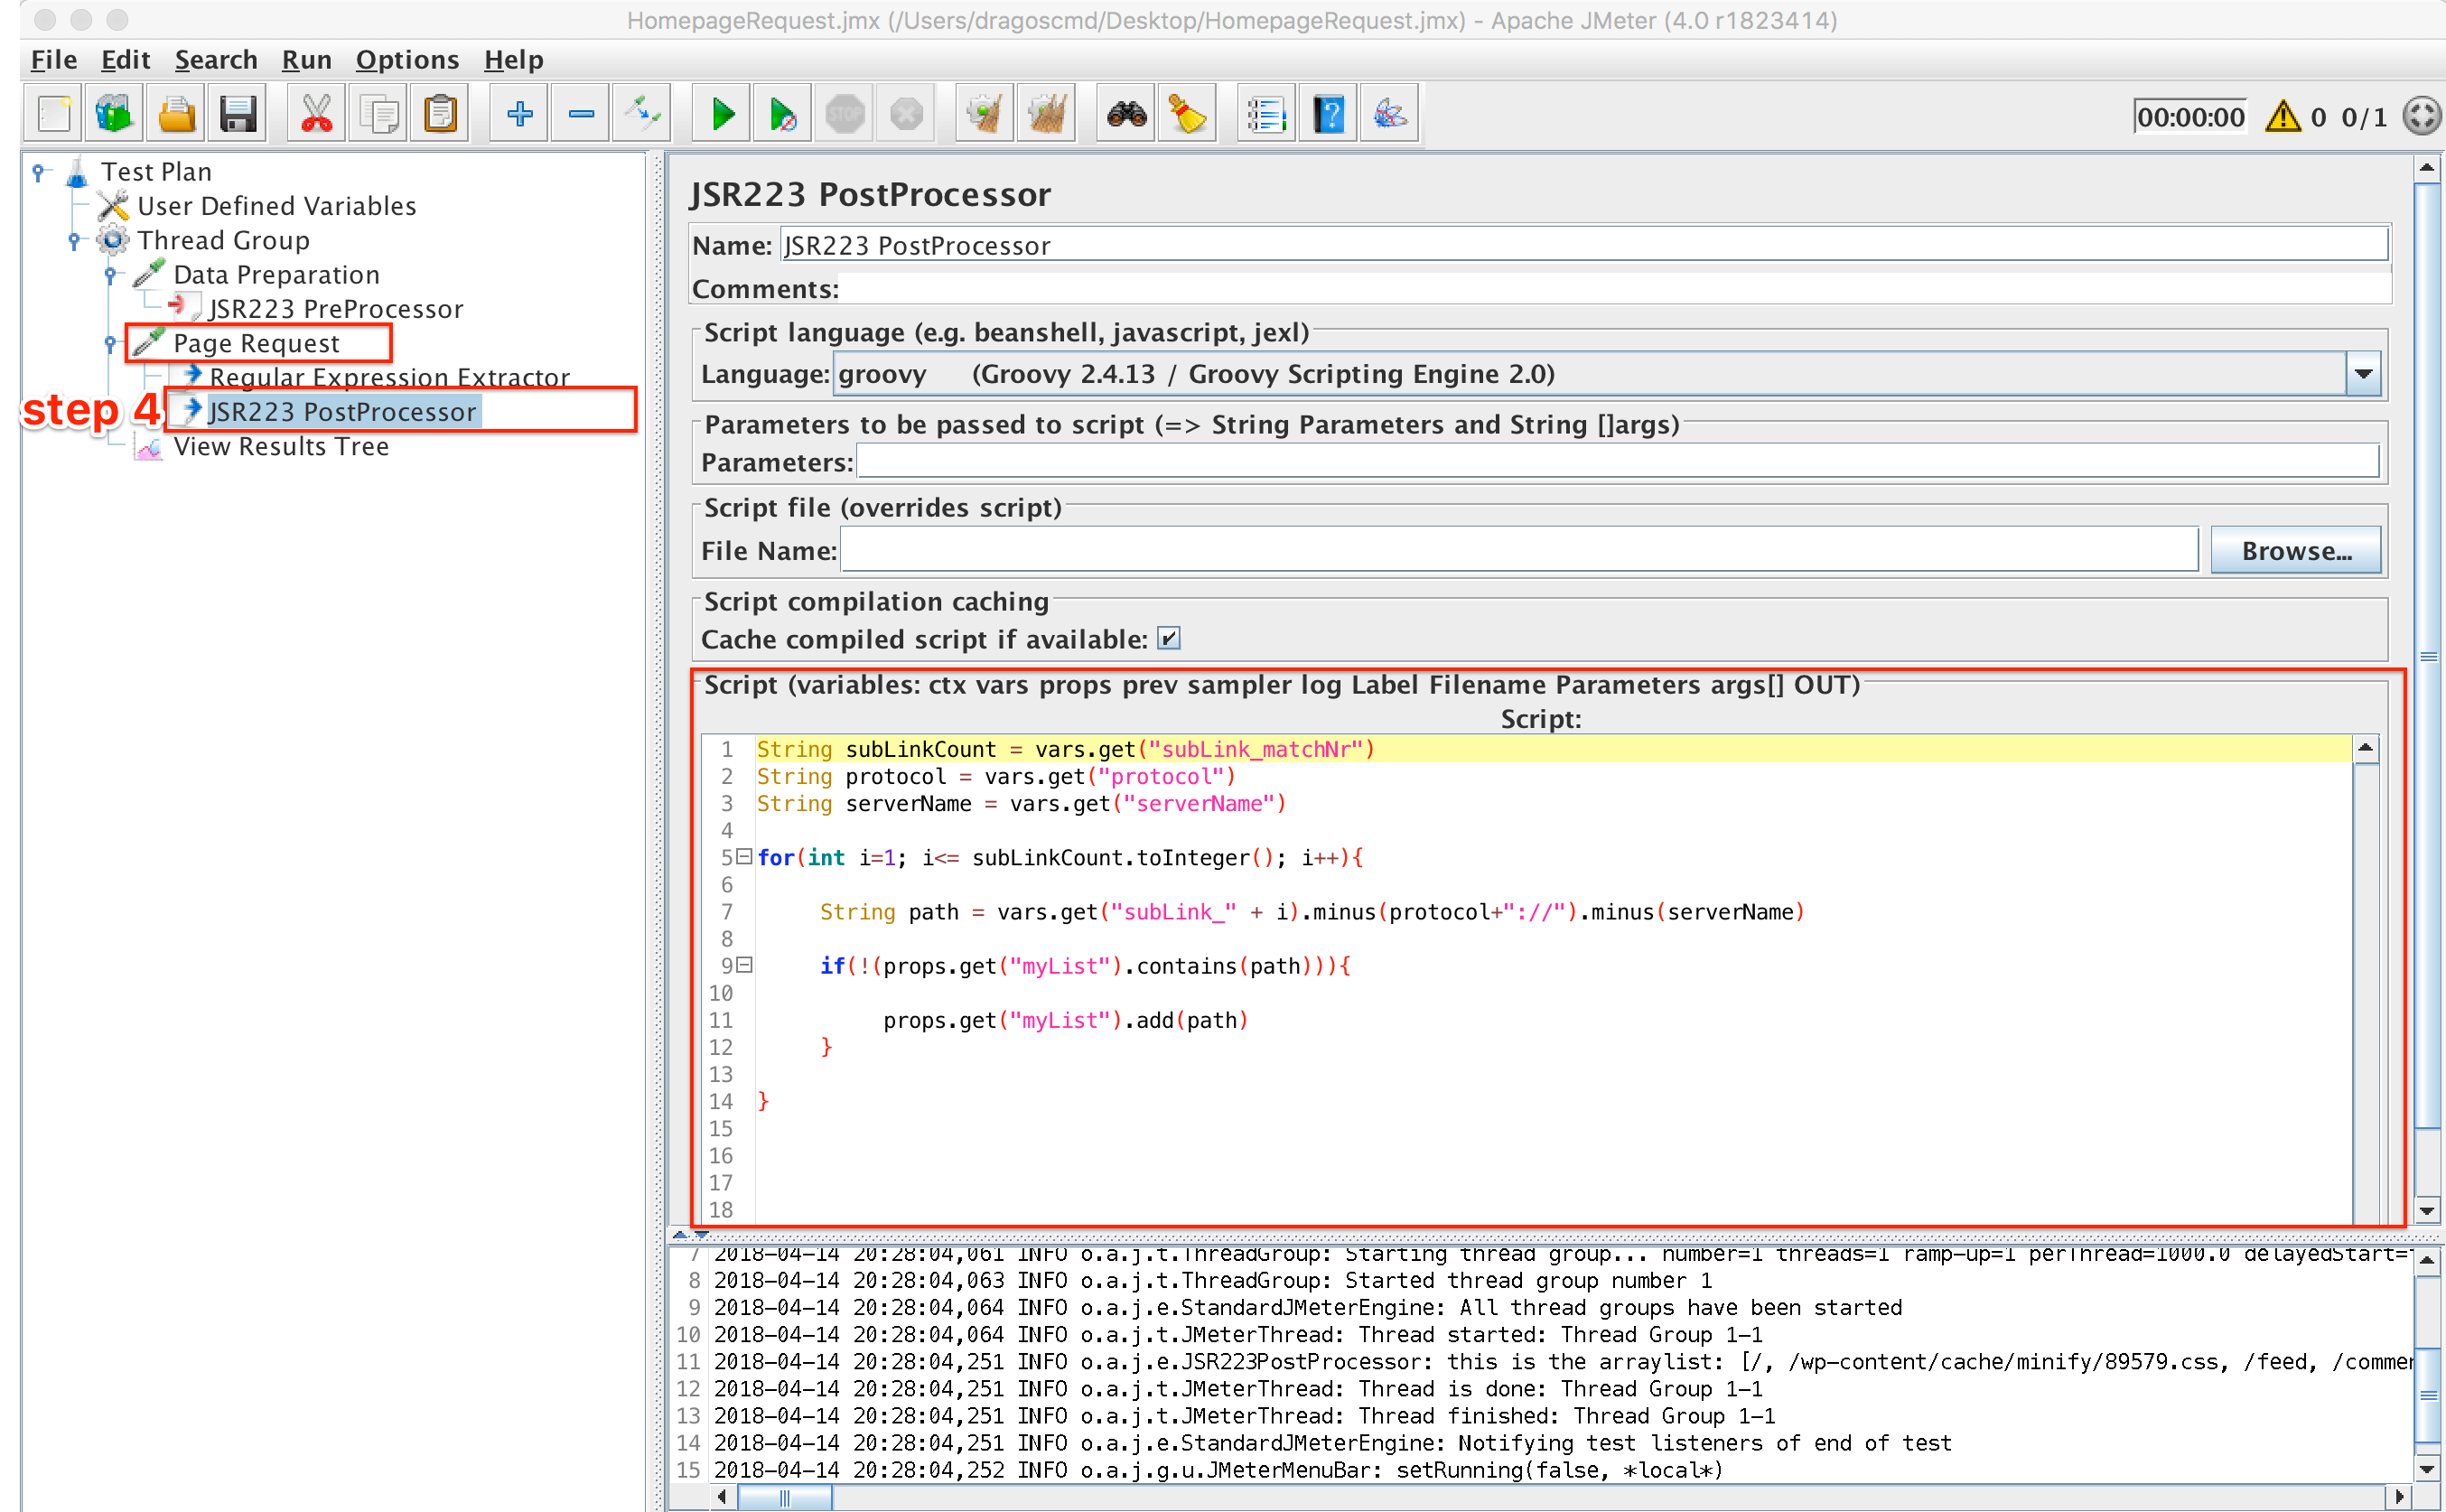
Step 4: Add all paths extracted to the ArrayList
To do this we will need a Groovy post processor which is added as a child of the initial request.
What we need to do here is iterate through all the extracted URL values, and remove the server name and protocol strings from the URL so that only the path is left. Then, check if that path already exists in the ArrayList. If it doesn’t, then we will add it to our ArrayList. The following code snippet does just that:
String subLinkCount = vars.get(“subLink_matchNr”)
String protocol = vars.get(“protocol”)
String serverName = vars.get(“serverName”)
for(int i=1; i<=subLinkCount.toInteger(); i++)
{
String path = vars.get(“subLink_” + i).minus(protocol+”://”).minus(serverName)
if(!(props.get(“myList”).contains(path)))
{
props.get(“myList”).add(path)
}
}
If you want to see the contents of the newly formed ArrayList just use a console log like so:
log.info(“this is the list: ” + props.get(“myList”).toString())
Our script looks something like this by now:
ArrayList Builder
Now, we need to find a method to make separate requests using all the paths stored in the ArrayList. This will be done using a while loop in the next step:
Step 5: Setup a loop to iterate through all requests of the site
For this particular step, we need several elements:
5.1. First, we need to include our request in a while loop and define a condition when to break the loop. The loop will break when (breakWhile != true). The condition in the While Controller should be:
${__groovy(!(vars.get(“breakWhile”)).equals(“true”))}
The script now looks like this:
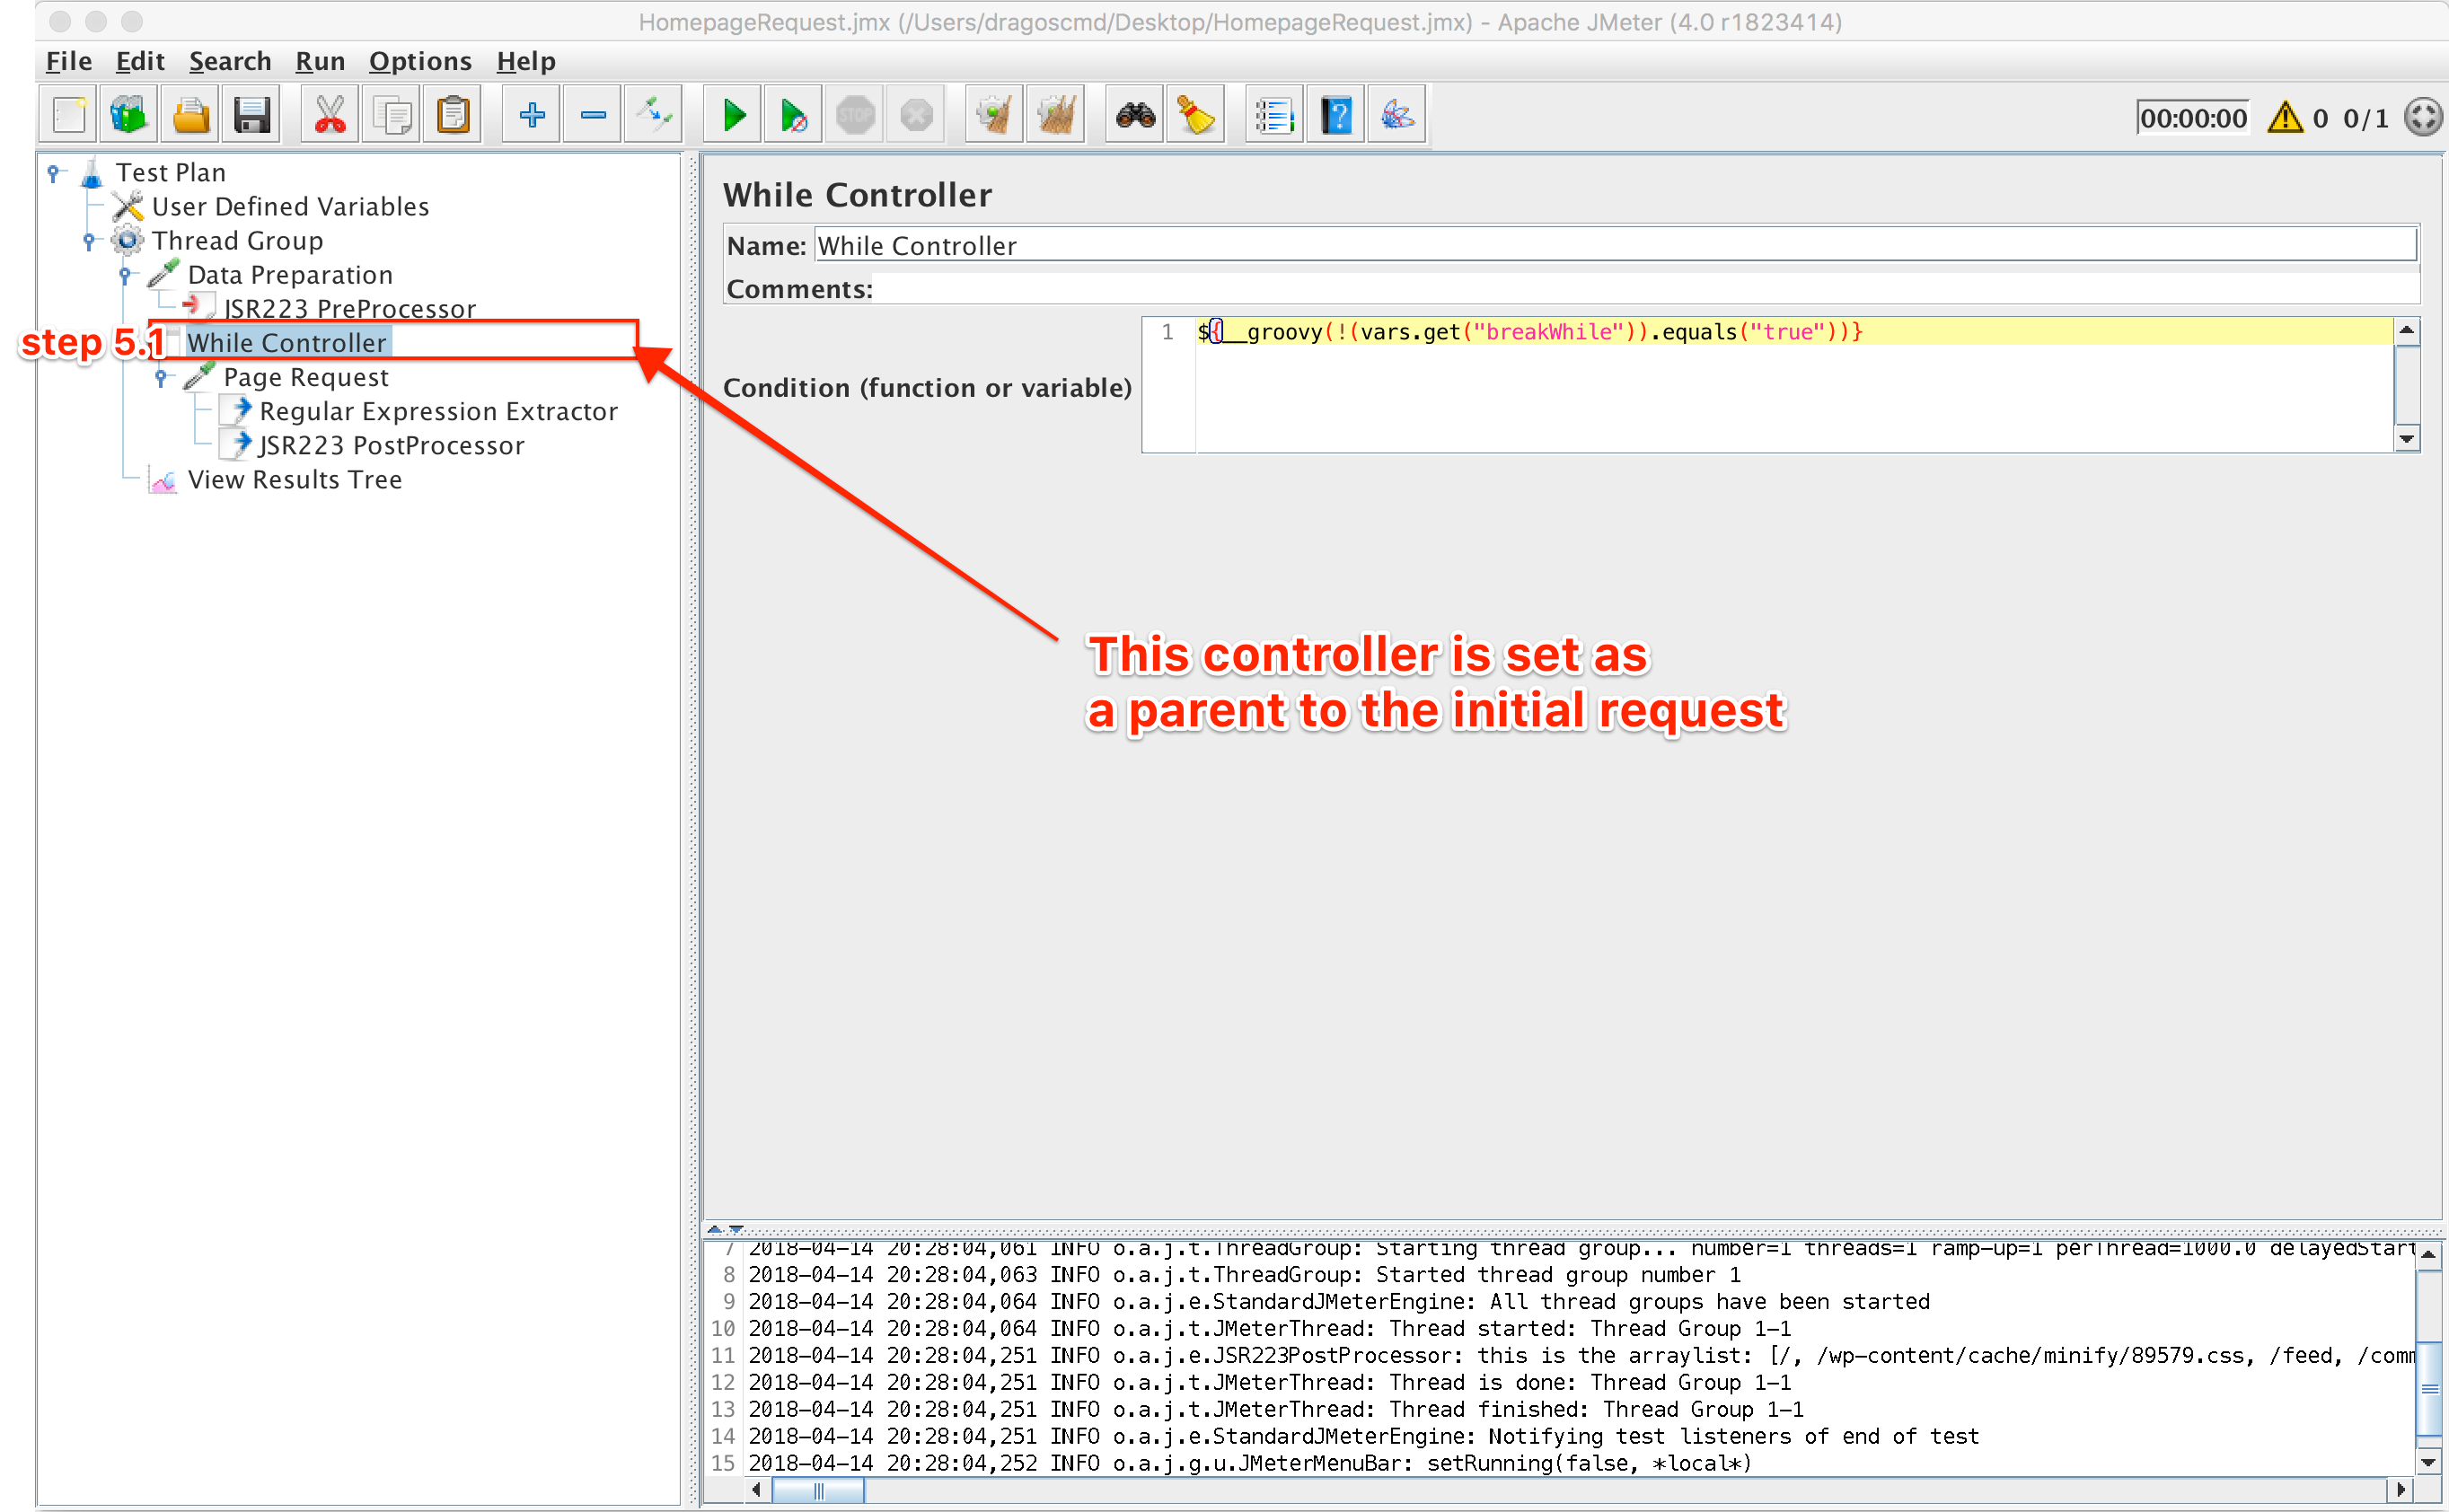
While Controller
5.2. To use this breakWhile variable we first need to initialise it in the Data Preparation section with ‘false’ so that you enter the loop
vars.put(“breakWhile”,”false”)
The script looks like this now:
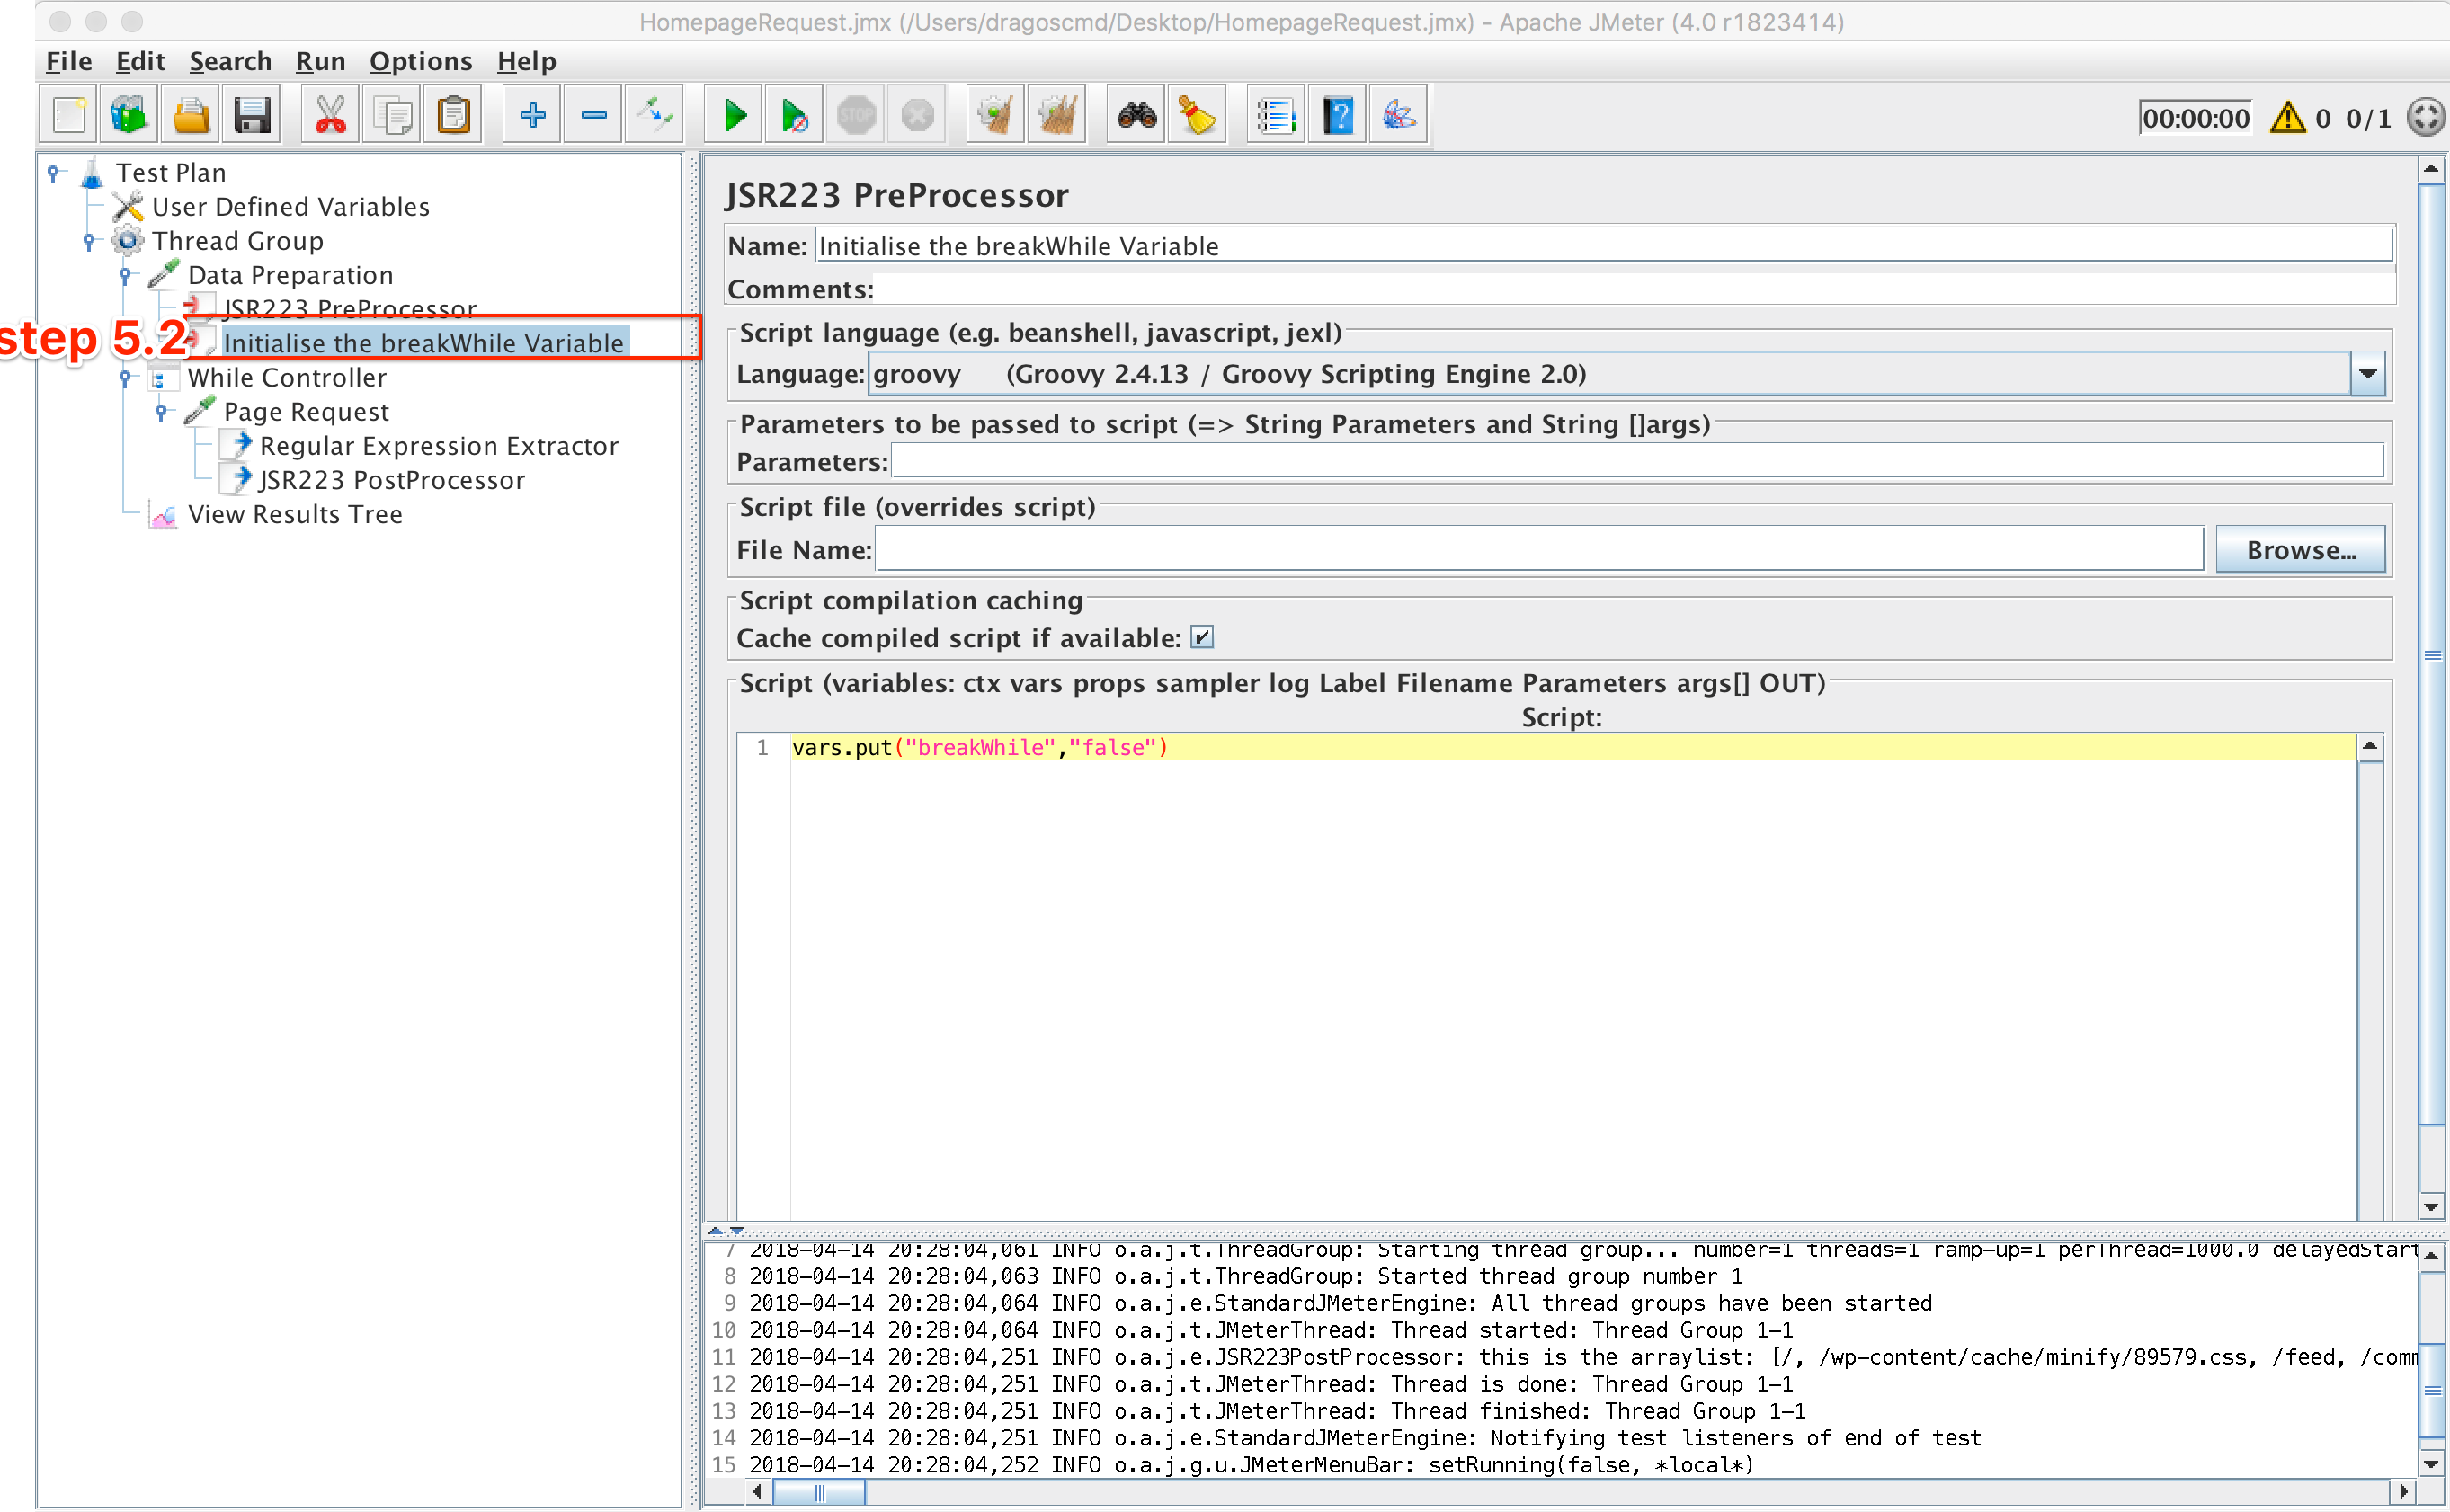
BreakWhile Initialise
5.3. With this setup we have an infinite loop so we need to determine when to break it. The ArrayList size will continue to grow until all corners of the site have been crawled, and all unique paths have been added to the ArrayList.
This means that we must exit the loop when the (number of individual requests we made == the size of the ArrayList).
For this, we need 2 things: The first is a counter which starts from 1 at the beginning of the loop and is incremented by 1 each time we iterate through that loop. The second is an if condition in the request post-processor where the breakWhile variable becomes ‘true’ if the conditions are met. This condition is:
if(vars.get(“counter”).equals(props.get(“myList”).size().toString()))
{
vars.put(“breakWhile”,”true”)
}
The script looks like this now:
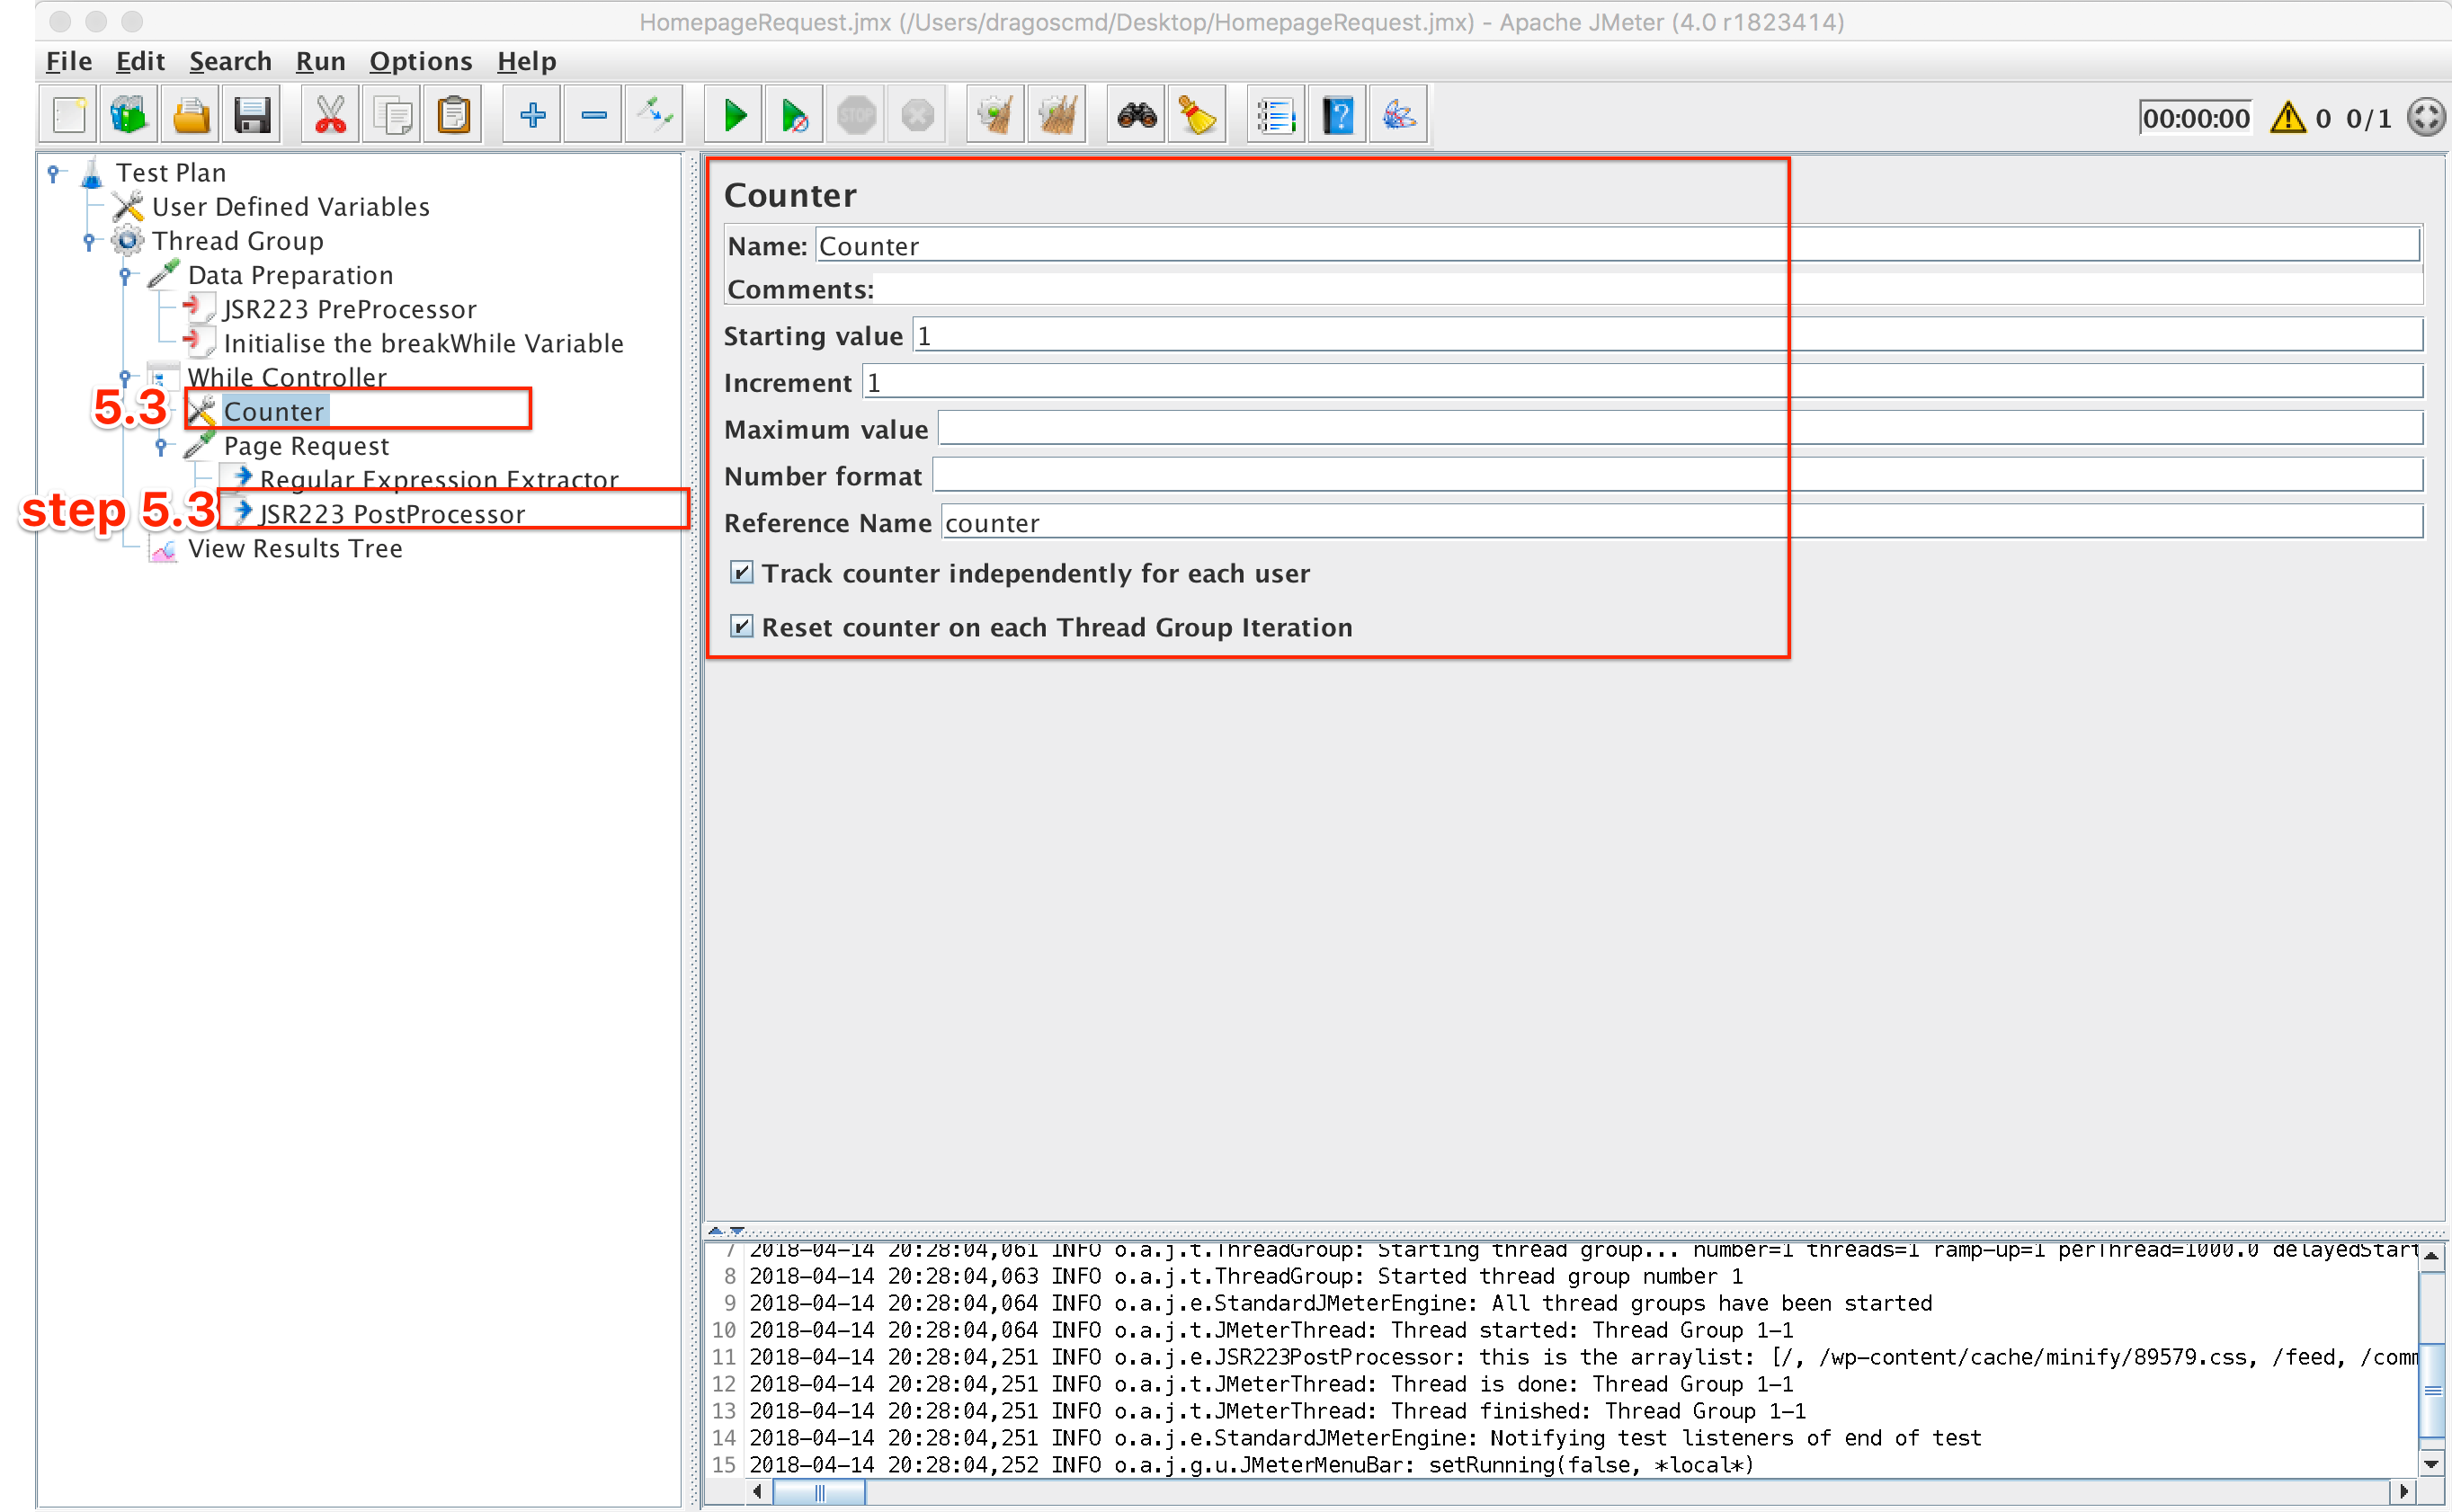
Define Loop End
5.4. The last step is to build the path for each individual request, starting with the homepage. This will be done in a pre-processor so that the path is ready to be used when the request is made. The snippet for this is:
vars.put(“path”, props.get(“myList”)[(vars.get(“counter”)).toInteger()-1])
This is the final element which we need to add:
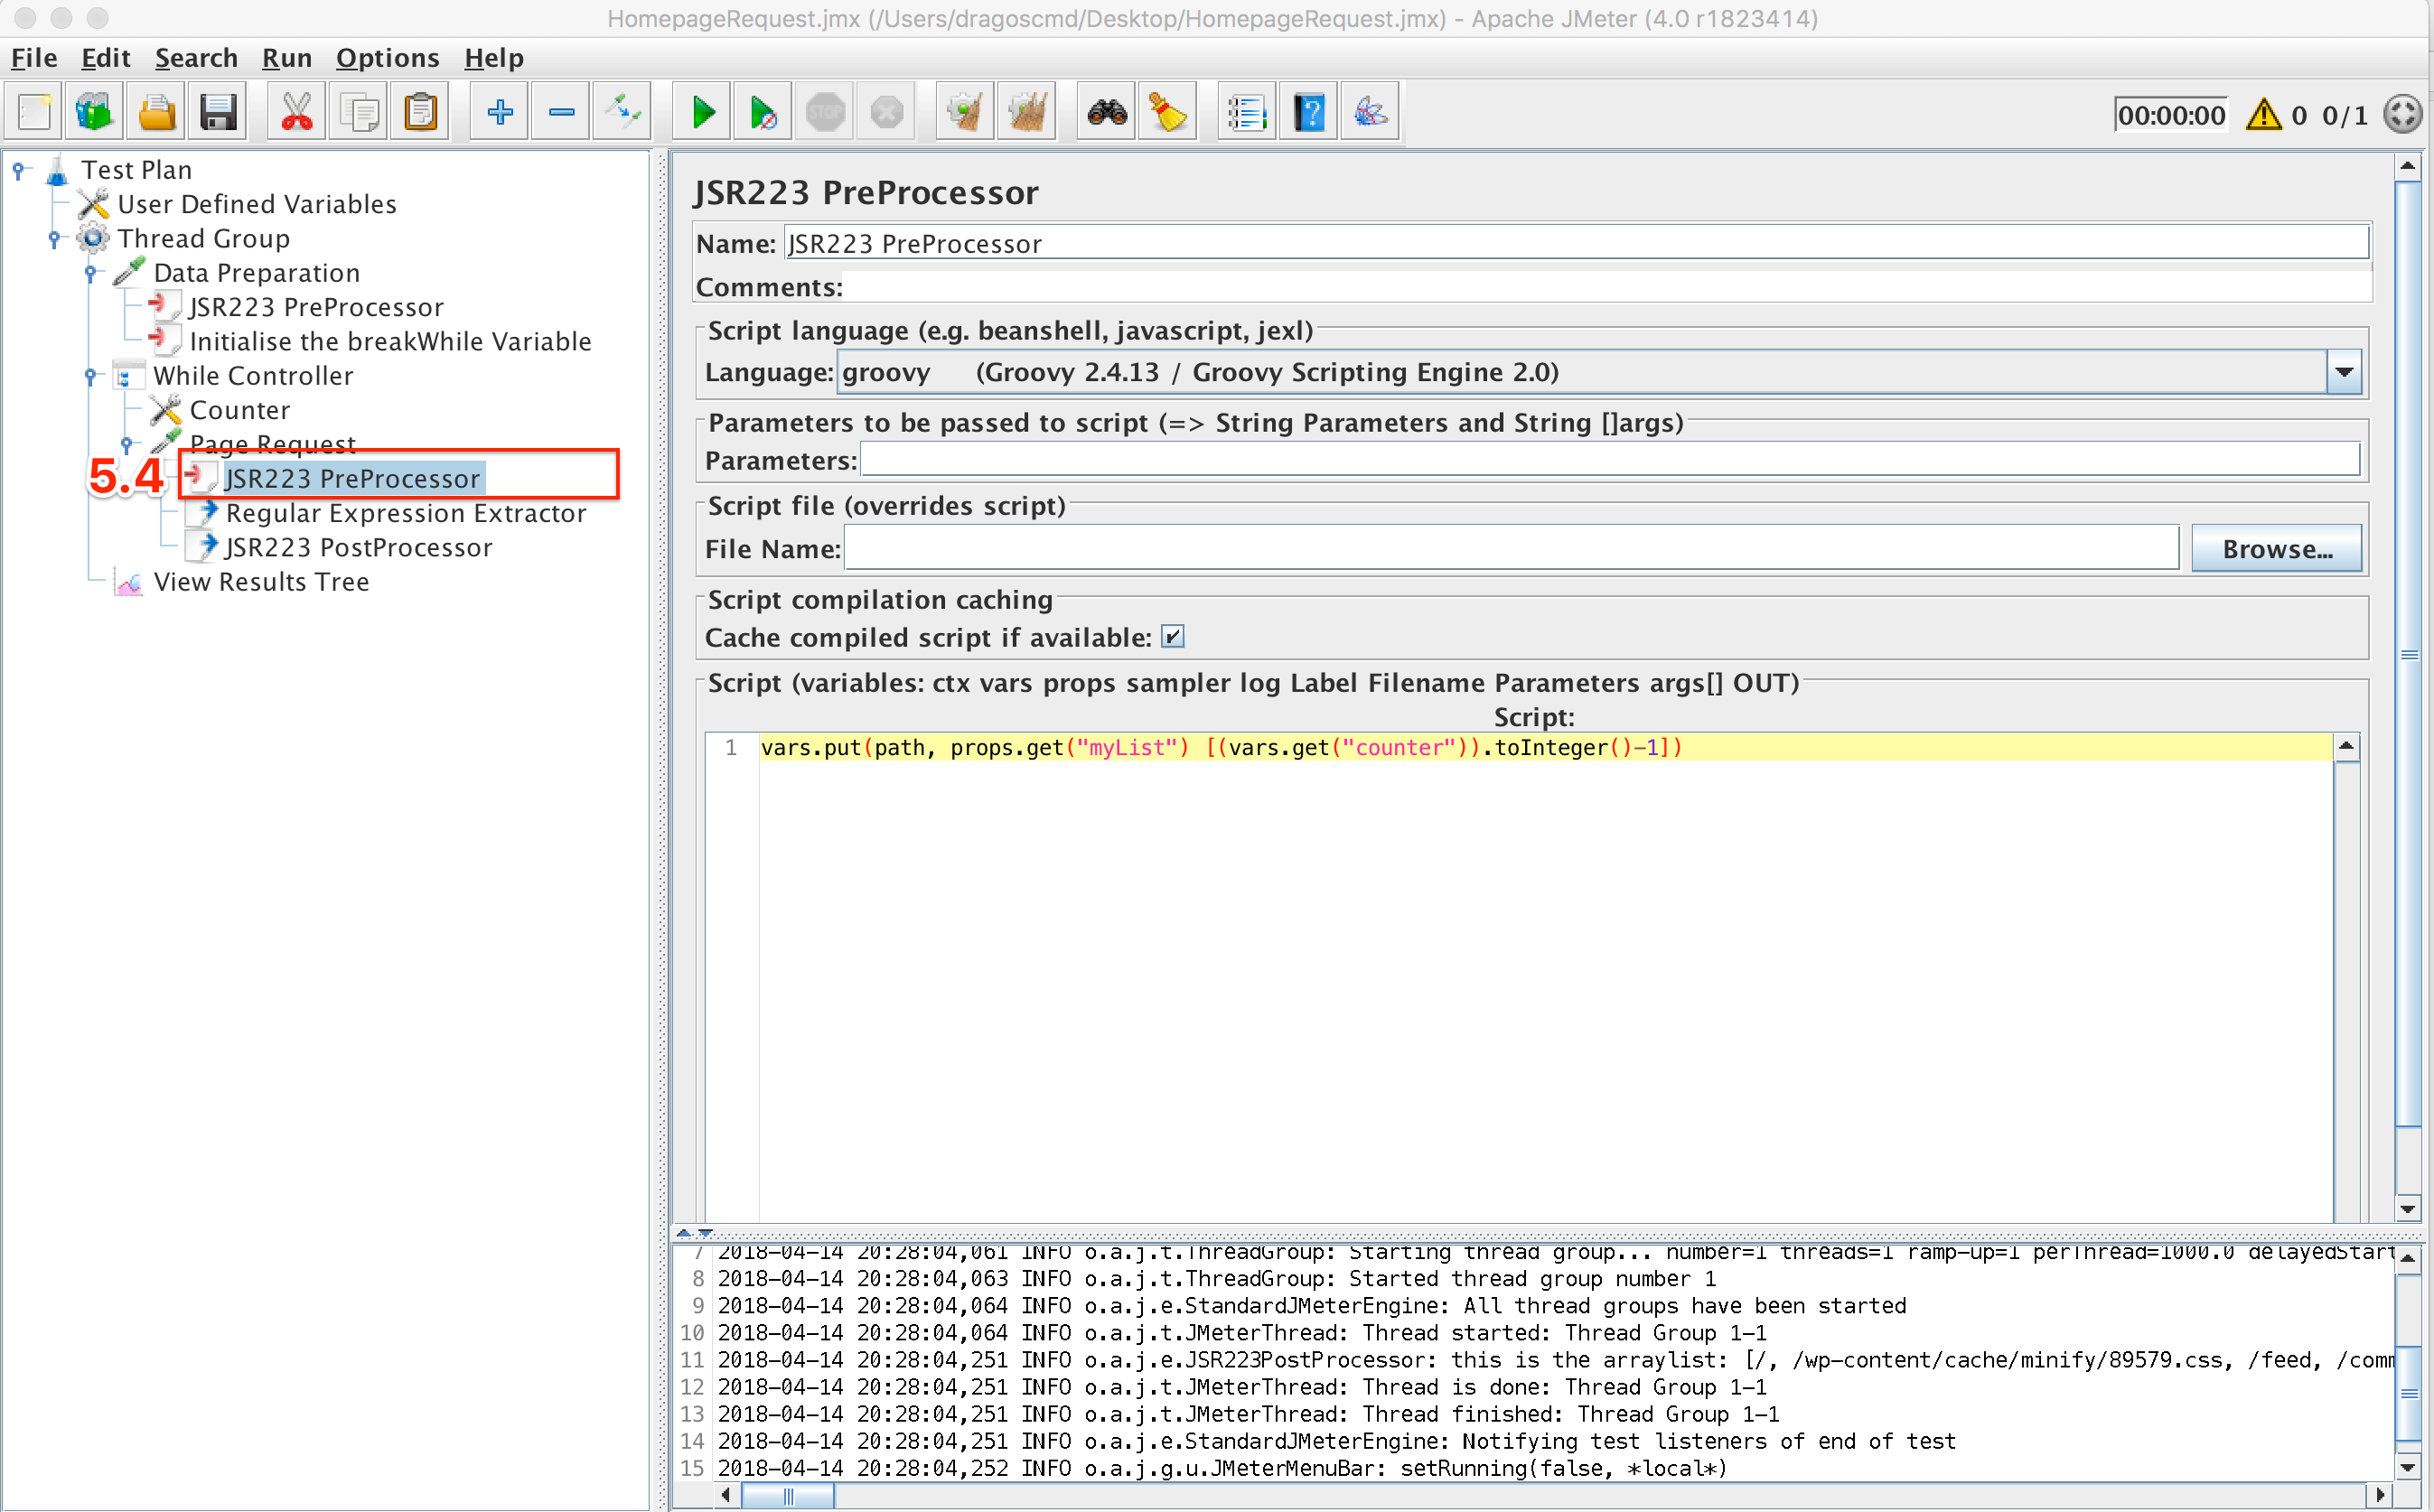
Define the Path Variable
The path variable will hold the values in the ArrayList from start to end: ArrayList[0], Arraylist[1],…, ArrayList[n].
And the script is basically done — 14 lines of code!
All that’s left is to configure the script to crawl your own site not the one presented in this demo. That takes us to:
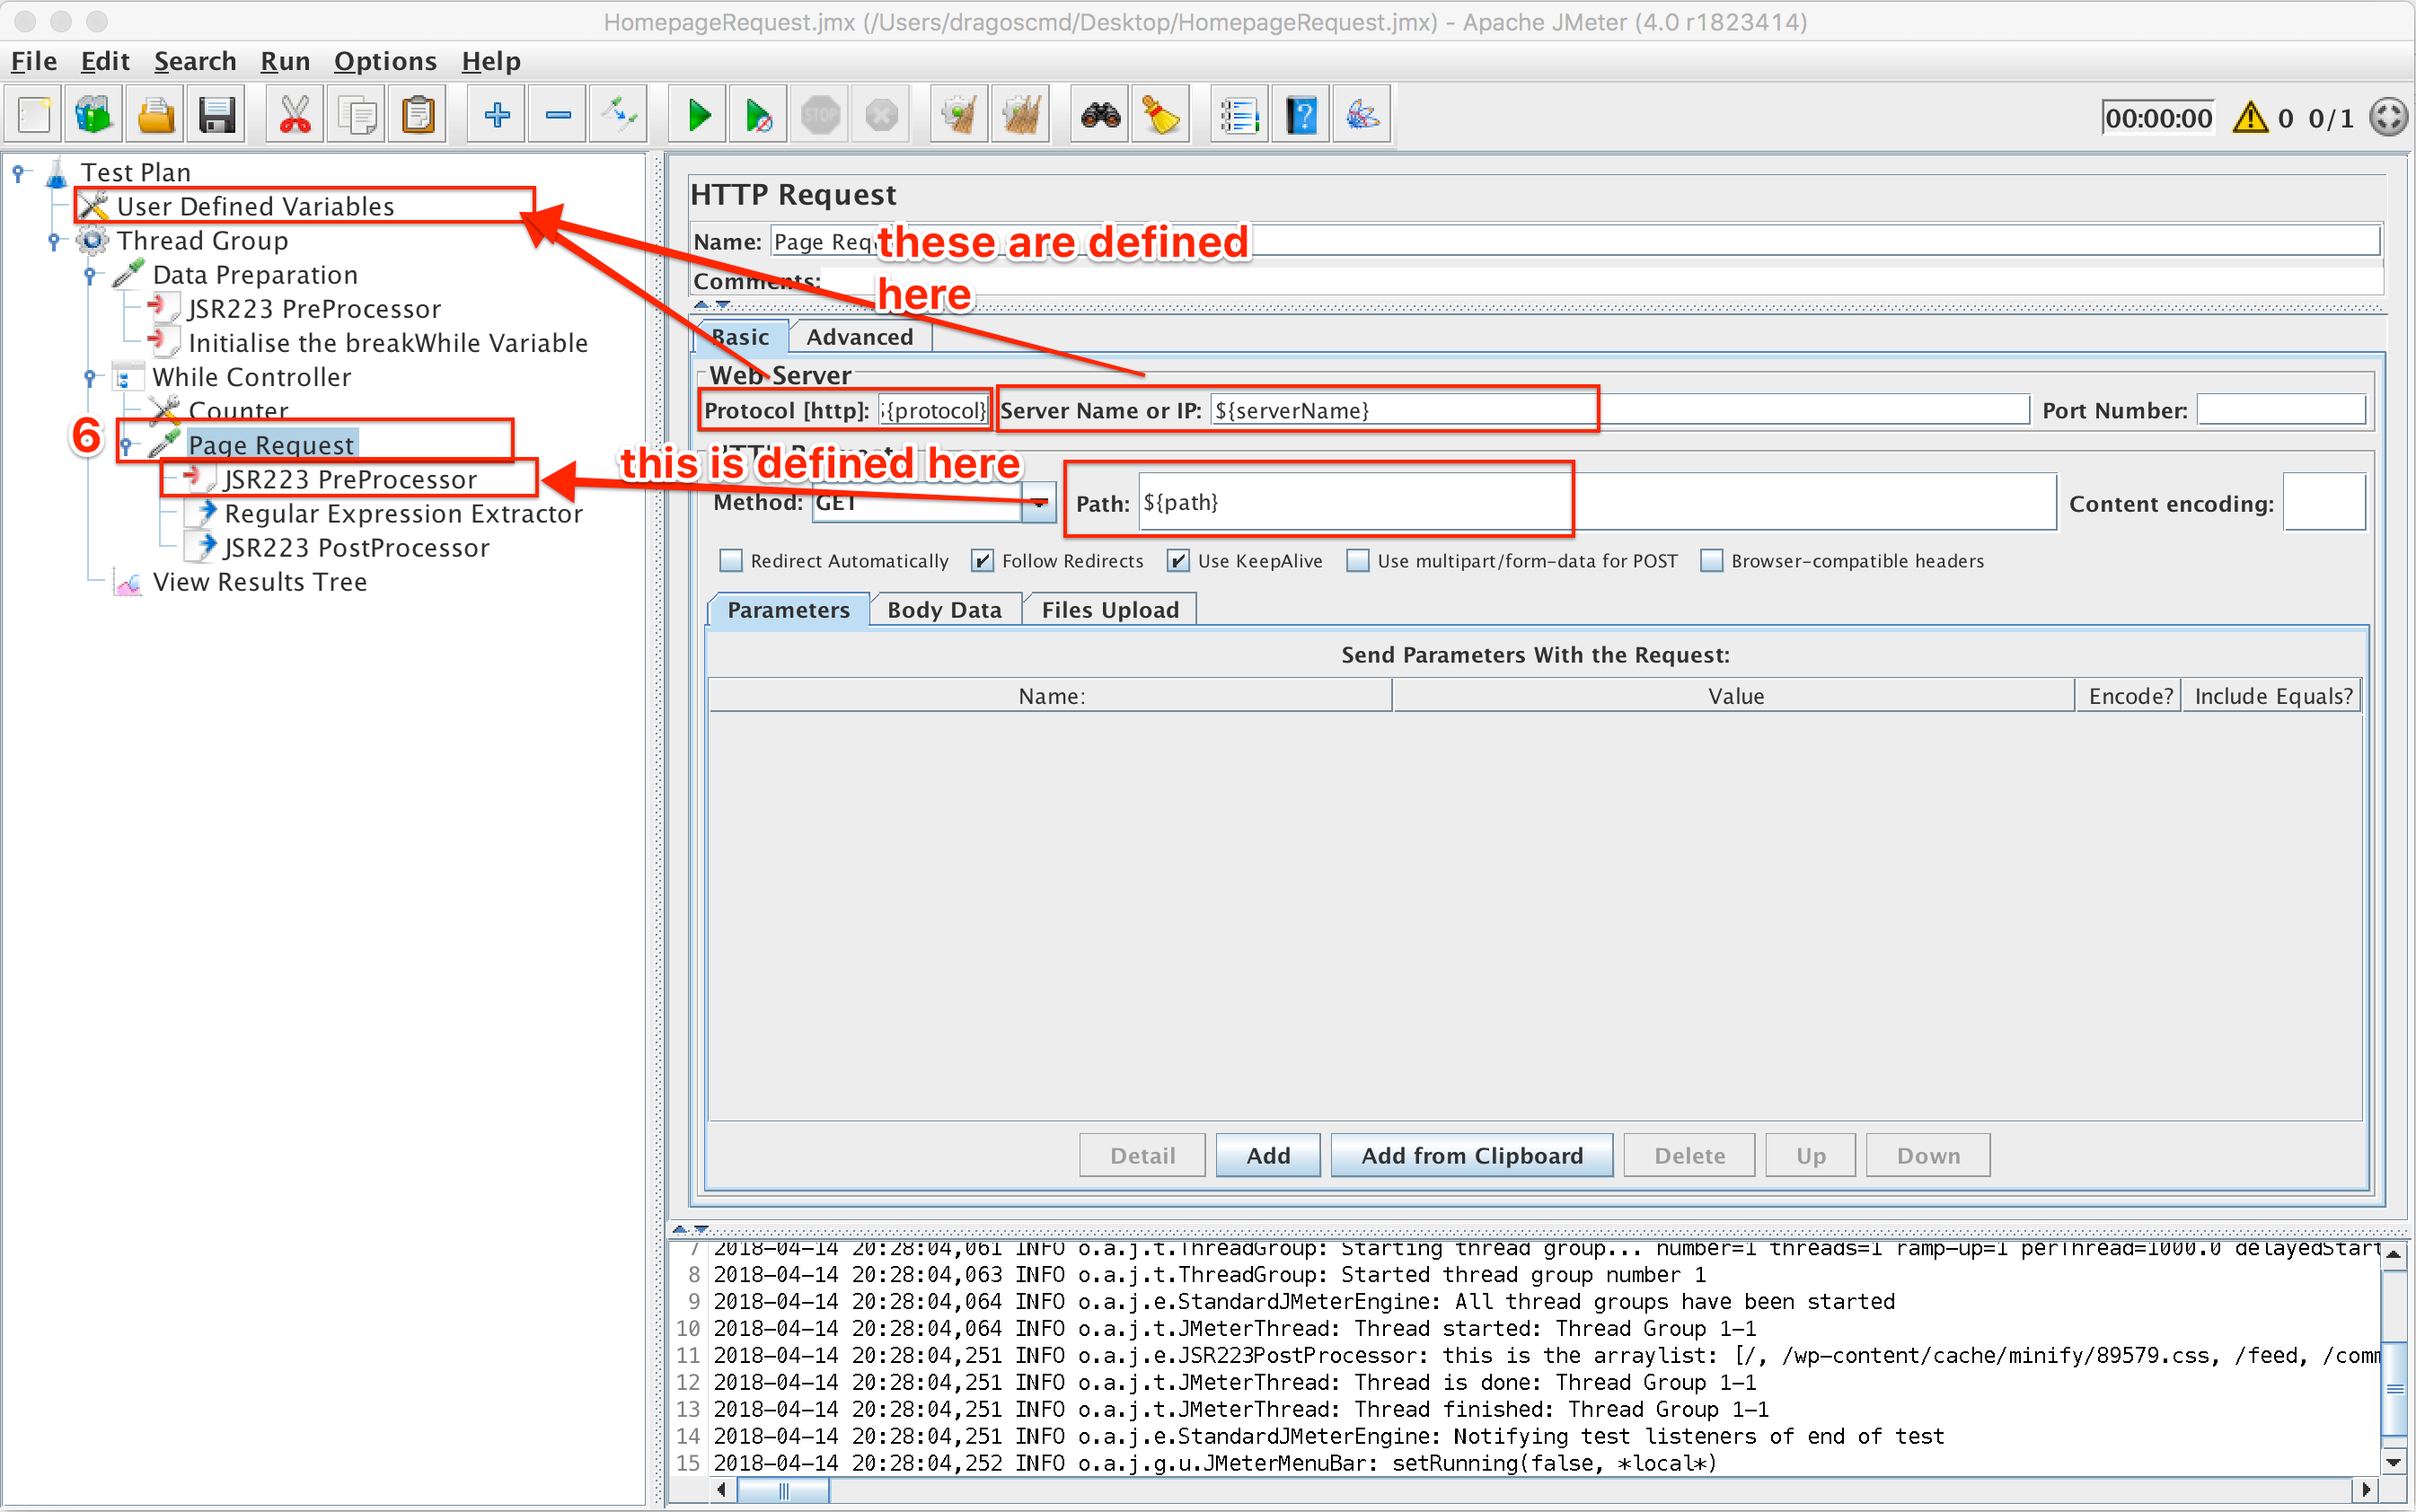
Step 6: Using the script on your website
The only thing left to do in order to use the script we created on your website. To do this you have to define the protocol, and server name (in the User Defined Variables section) as mentioned before step 1. Then, we need to use the path which we created in the ‘Path builder’ pre-processor by simply calling it like ${path} in the path field of the HTTP Request. Also, you might have to define the headers for the requests you are going to make in your website using a HTTP Header Manager.
As I’ve mentioned before, please add a timeout between requests and use the script it responsibly. You wouldn’t want to make denial of service because of a wrong setting.
Also, depending on the site under test, you might need to add some extra configuration elements like a Header Manager, Cookie Manager, and even Cache Manager. The Evozon site for example will timeout all requests after you make 4 or 5. This happens if you don’t add headers to your requests and it detects it’s a robot ‘navigating’ the site.
The script should now look like this:
Complete Sampler Setup
Everything is set up now.
Approach breakdown
There are multiple advantages but also disadvantages to using this method of crawling. Some other applications or approaches might be more suitable depending on the goal you are trying to achieve.
But let’s explore some of the benefits and weak points present:
Advantages:
- You can build a highly customizable script.
- Responses to the pages you crawl can be processed in detail. This means that any data which is relevant to you can be extracted and manipulated afterward.
- You can do session-based crawling. For example, some websites require a login before you can access their content. With JMeter, you can easily do that. OWASP Zed Attack can also do this but other tools like Xenu cannot unless you pair them with other applications like Fiddler who can manage a web session.
- The crawler can run on any major operating system since JMeter is 100 % Java. So, you just need to have Java installed.
- You won’t make a request to the same page more than once.
- It can easily be extended to do various things like the example mentioned above, check which pages are redirects, check which links take you to some specific external sources, search for occurrences of a particular item in all pages of a website, and other scenarios.
Disadvantages:
- You need to have some JMeter knowledge.
- Some basic programming skills are involved.
- Other applications are much more suitable for crawling depending on what scenarios you need to fulfill. Those crawlers usually involve an easier step-by-step configuration.
- This JMeter crawler only goes through the pages exposed in the HTML responses, where not all endpoints are visible, whereas a more advanced crawler can go deeper than that.
- An approach like this will go through the GET requests of a website only, while a more complex app like OWASP Zed Attack also performs DELETE or POST requests.
- Since we are using an ArrayList, every time we find a new path, we have to check against all existing elements in the ArrayList. For sites that have a large number of pages, this operation could get costly. In this situation, a possible solution would be to use Groovy Sets, which would handle this more efficiently (some info regarding Sets can be found here). A Set is a collection where all elements are unique.
- Using a general regex such as the one presented in the example above may results in extracting values which are not all in the same format. Some could be the full URLs to the page. Some could be only the paths and some could be partial paths. In these situations, extra processing might be required.
In conclusion…
As testers, we are usually exposed to various tools which help us make our job easier. Depending on the task at hand, we have to select the right tool or combination of tools to do that task efficiently.
This means that the script presented above could be a good choice in some situations and a poor one in others. Only use it if it brings a plus value to your project over other approaches or if you want to gain a better understanding of the JMeter app.
by Dragos Campean